

anir22
-
Content Count
6 -
Joined
-
Last visited
Content Type
Profiles
Forums
Blogs
Gallery
Posts posted by anir22
-
-
Most of my videos would get an error messages and I kept looking online for the video resolution and formats and after few days found this and wanted to share with you all.
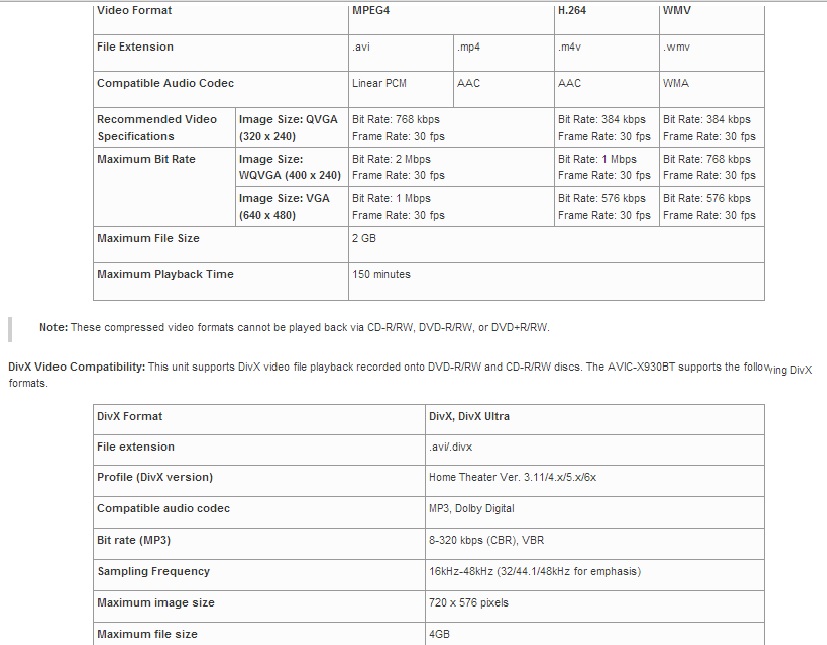
Video Playback: The Pioneer AVIC-X930BT supports the following video files recorded onto a USB storage device or a microSD/microSDHC memory card:Video Format MPEG4 H.264 WMV File Extension .avi .mp4 .m4v .wmv
Compatible Audio Codec Linear PCM AAC AAC WMA
Recommended Video Specifications Image Size: QVGA (320 x 240)
Bit Rate: 768 kbps
Frame Rate: 30 fps Bit Rate: 384 kbps
Frame Rate: 30 fps Bit Rate: 384 kbps
Frame Rate: 30 fpsMaximum Bit Rate Image Size: WQVGA (400 x 240) Bit Rate: 2 Mbps
Frame Rate: 30 fps Bit Rate: 1 Mbps
Frame Rate: 30 fps Bit Rate: 768 kbps
Frame Rate: 30 fpsImage Size: VGA (640 x 480) Bit Rate: 1 Mbps
Frame Rate: 30 fps Bit Rate: 576 kbps
Frame Rate: 30 fps Bit Rate: 576 kbps
Frame Rate: 30 fps Maximum File Size 2 GBMaximum Playback Time 150 minutes
Note: These compressed video formats cannot be played back via CD-R/RW, DVD-R/RW, or DVD+R/RW.
DivX Video Compatibility: This unit supports DivX video file playback recorded onto DVD-R/RW and CD-R/RW discs. The AVIC-X930BT supports the following DivX formats.
DivX Format DivX, DivX Ultra File extension .avi/.divxProfile (DivX version) Home Theater Ver. 3.11/4.x/5.x/6xCompatible audio codec MP3, Dolby DigitalBit rate (MP3) 8-320 kbps (CBR), VBRSampling Frequency 16kHz-48kHz (32/44.1/48kHz for emphasis)Maximum image size 720 x 576 pixelsMaximum file size 4GBNote: DivX files cannot be played on a USB memory device or SD memory card.
-
Look, when I installed my unit (x930) I found similar problem. Look at a menu item in settings > system settings > back camera and try changing the polarity option.
I hope that resolve your problem.
Sorry my crash english, I'm from Brazil.
Good luck buddy.
I got it working. I connected the camera power cable and the reverse input signal wire from the x930bt to the same 12v output behind the license plate.
In x930bt there is a option to view the rear camera whithout reversing for trailers etc. but my camera doesnt stay on. Any idea which wire I should connect it to keep it on(right now I have connected it to green/white wire in murano 06)
Any idea where speed sensor wire can be connected to?
-
I would suggest that the camera power come from the +12v to one of the reverse (backup) lights and make a separate ground connection to metal as generally hooking the camera across the backup light does not work. Did you use an adapter harness to connect the stereo into the car's electrical system? If you did, the instructions should have said what colored wires are for the speed and reverse signals on you model car so you can connect the wires correctly. The wire colors for the Pioneer head unit are spelled out in their install instructions.
Thanks for your reply.
Yes I used the adapter harness to connect the stereo to the factory connection. It has the label on the pioneer system on the wire as speed sensor and reverse signal but I dont know where to connect these wires.
I found this in the manual "Violet/White (REVERSE GEAR SIGNAL INPUT)
This is connected so that the navigation system can detectwhether the vehicle is moving forwards or backwards.Connect the violet/white lead to the lead whose voltagechanges when the shift lever is put in reverse. Unlessconnected, the sensor may not detect your vehicle travelingforward/backward properly, and thus the position of yourvehicle detected by the sensor may be misaligned from theactual position." but I dont know where this wire will connect in nissan murano 06. -
I am trying to install a reverse camera PYLE PLCM18BC on my NISSAN MURANO 2006. I connected all the wires but when in reverse the screen doesnt change.What are the Reverse Gear Signal & Speed Signal wires for and how to and where to connect it.I have connected the yellow video cable from the camera to the back of the dvd player and connected the power cable wire with two wires red and black..red to the 12v(green/white) wire behind the licence plate for continuous connection and the other black wire to rear regulator mount for grounding.Am I missing any connection or doing something wrong?There is one wire on the x930bt with label reverse gear signal - where do I connect this?And another wire is Speed signal - where and how to connect this wire in murano 2006I would appreciate any help.
-
Just did it on my X930BT without a single hiccup

Downloaded the update via torrent and unzipped it's contents into a folder. Downloaded the updated VERINFO.DAT file and put it in the \Update directory of the unzipped files, replacing the previous file in the folder. Then placed the 3 files on the SD car; FIRMWARE folder, Update folder, and CARDINFO.cif
Powered the unit up, popped in the SD card, and within about 5 seconds it picked it up and asked to start the update.
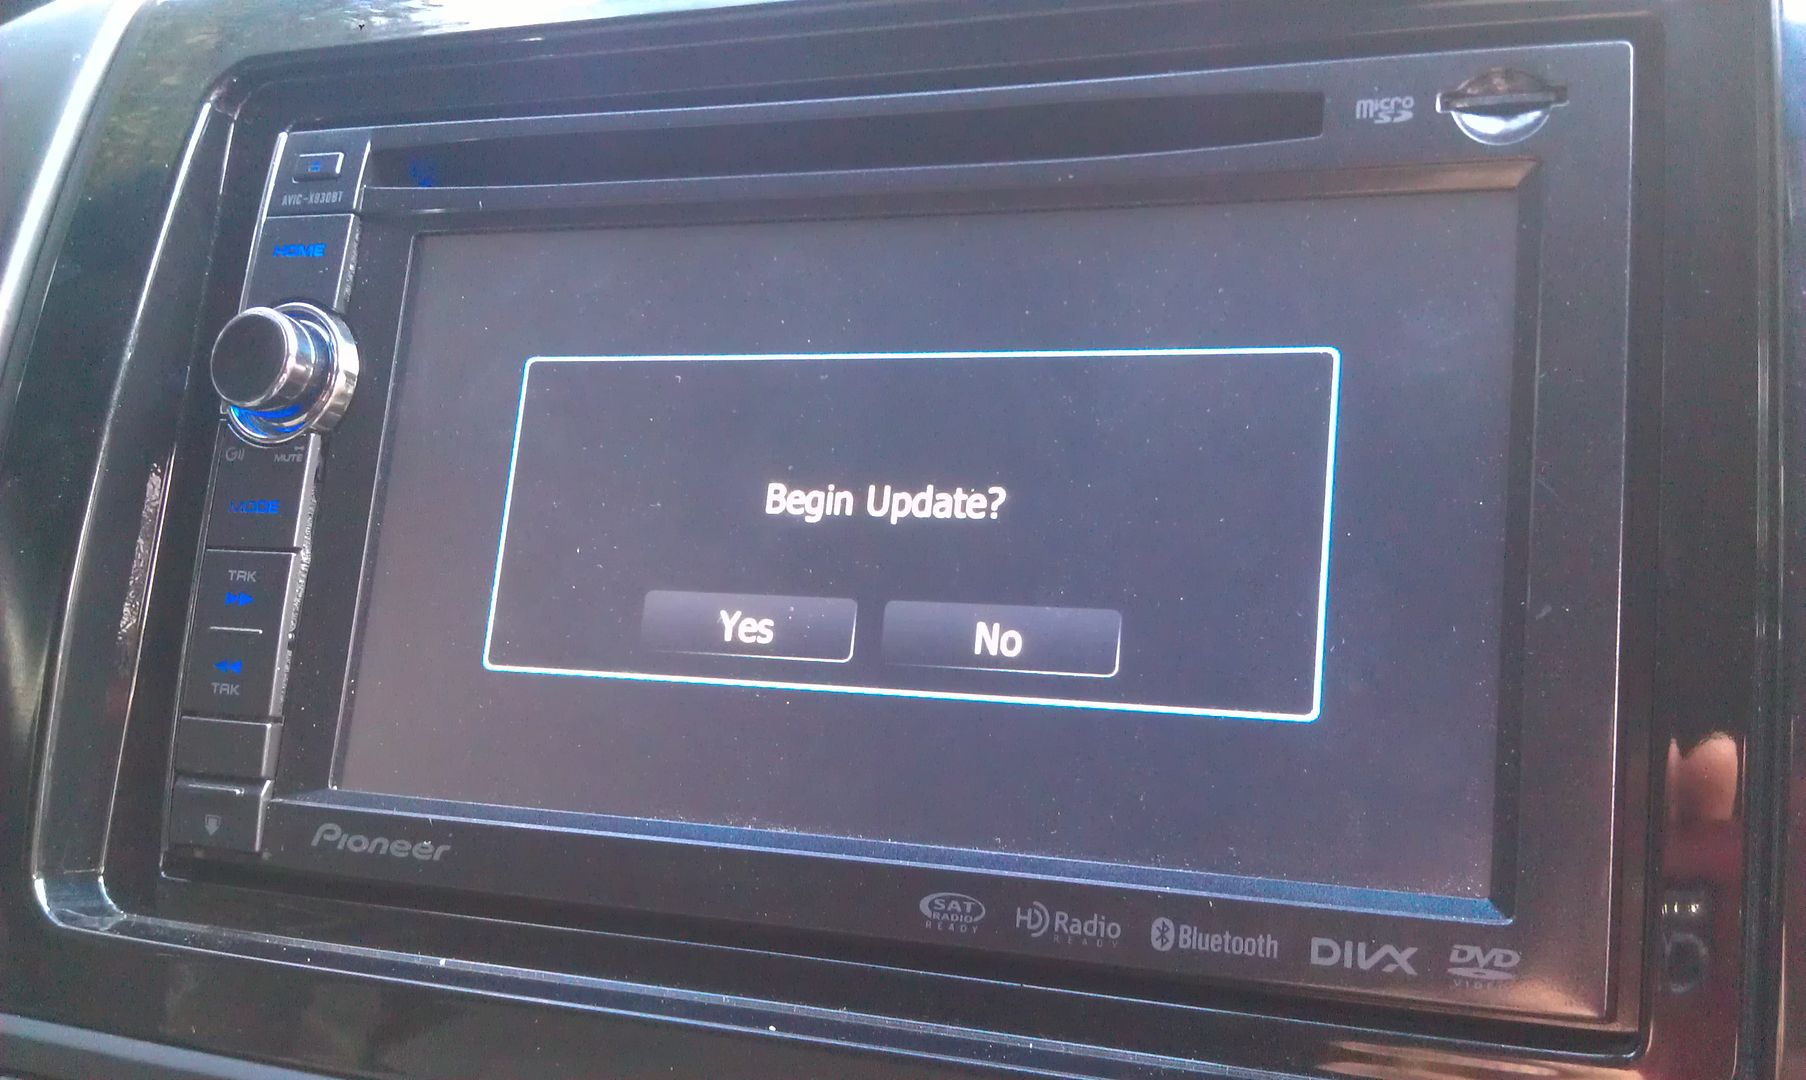
That update process took about 20 minutes
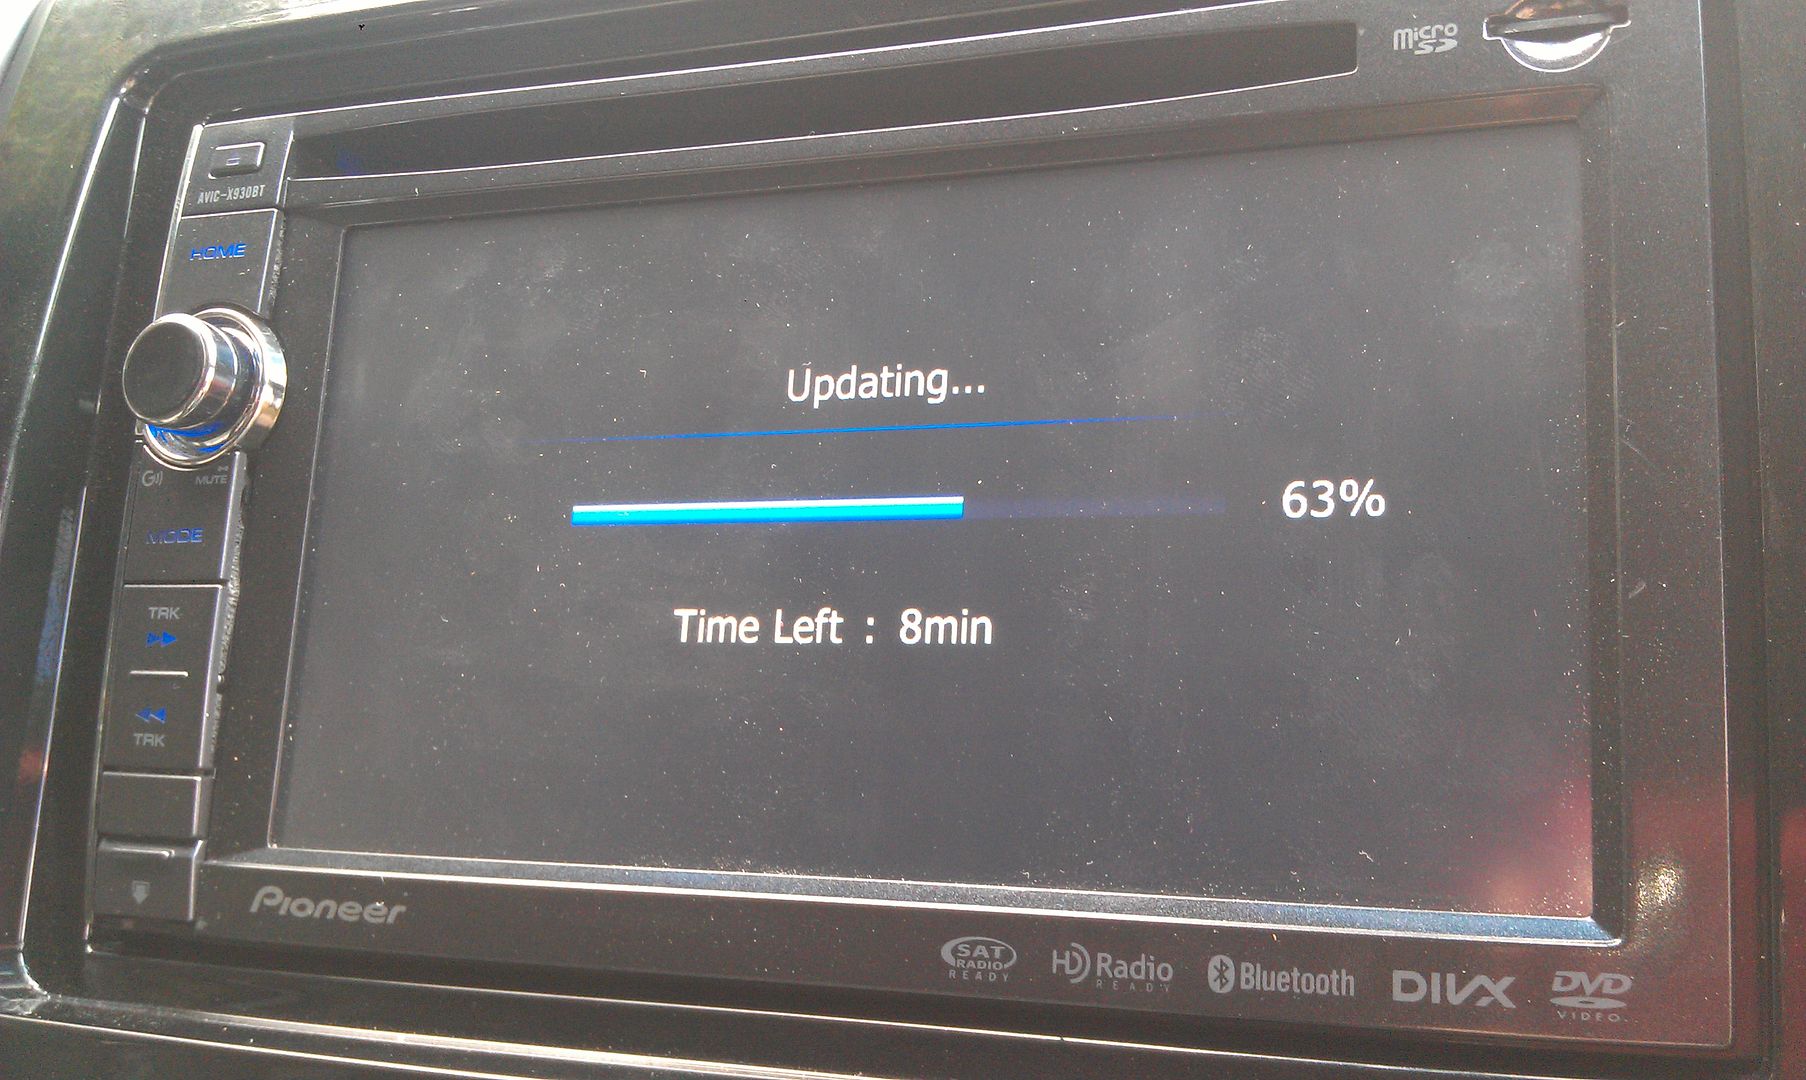
Once that's done the unit reboots and finishes updating
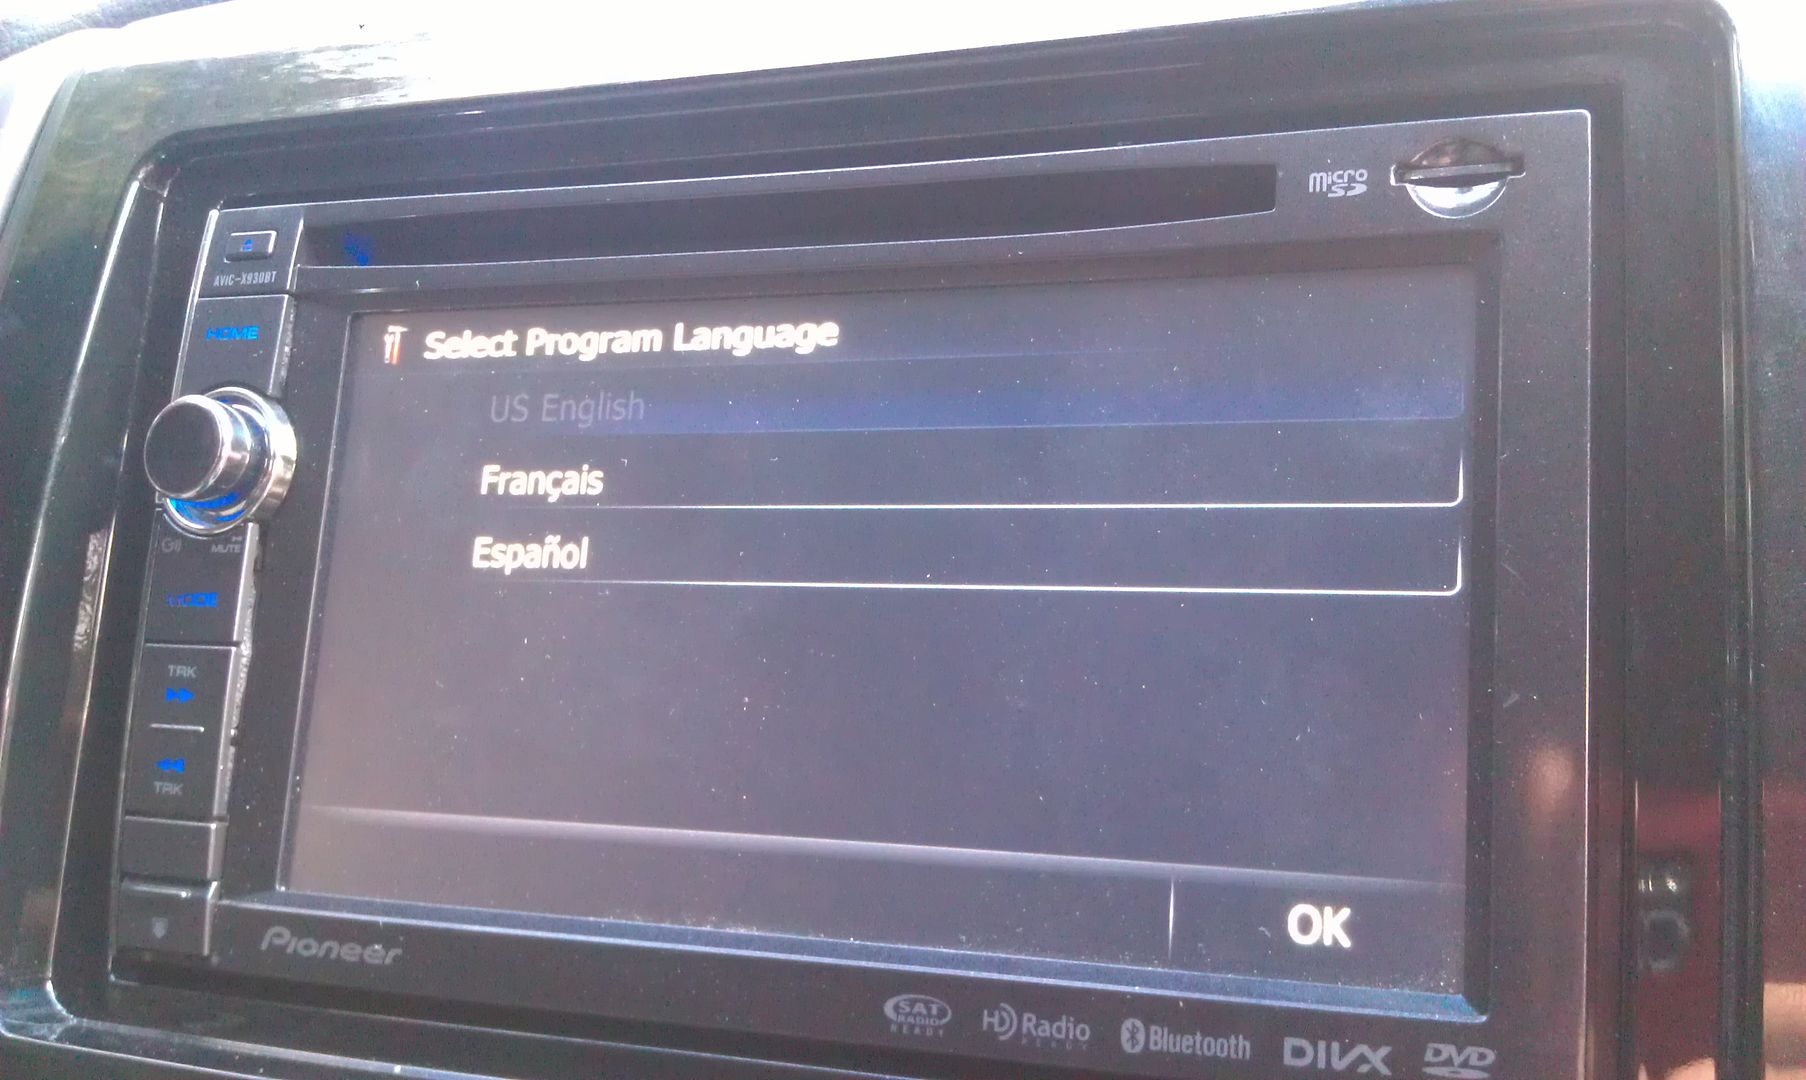
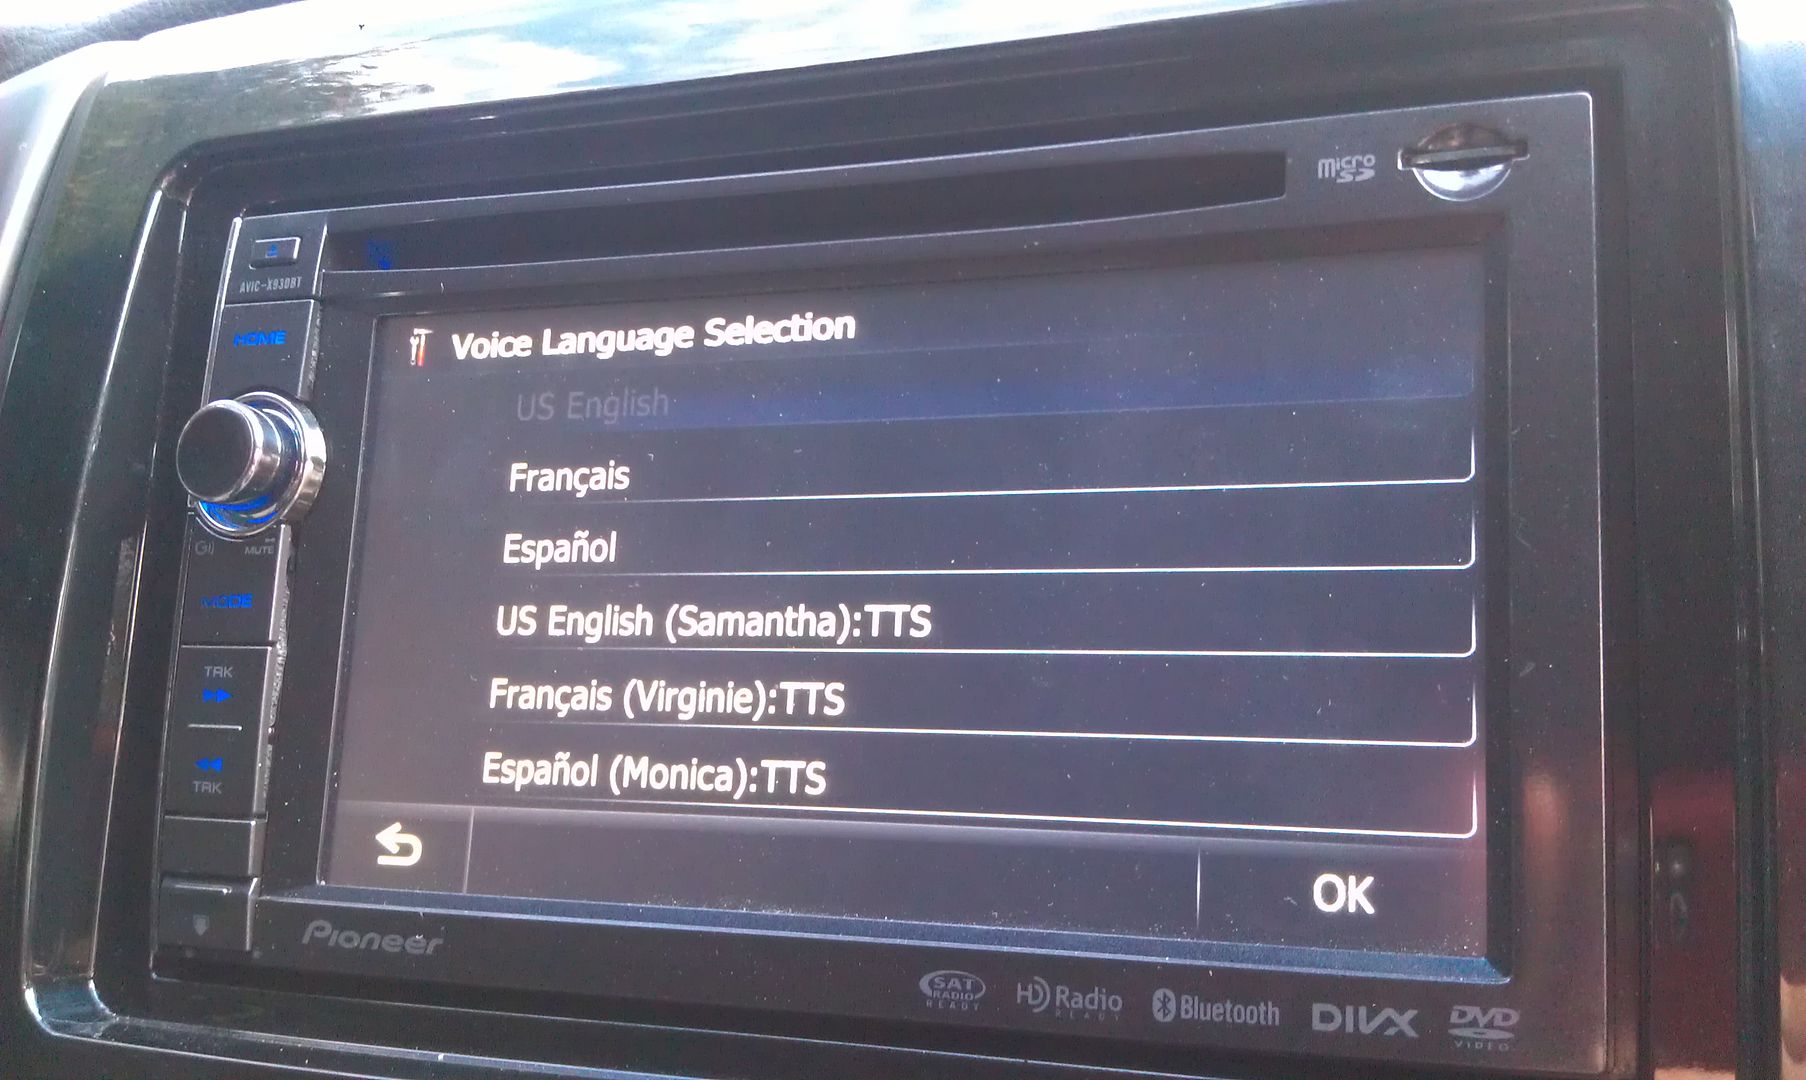
After that, you're greeted with language setup options
Once that's done, the update is complete!
By the way, if you're using a custom start up splash screen (as I am), you will not see any 2012 Pioneer splash screen for confirmation, because you're custom one is still going to show, so don't freak out when that doesn't show up upon the unit rebooting, lol.
After you go through the language setup, it's going to ask to do the update again. If you don't want to sit there for another 20 minutes, hit no...
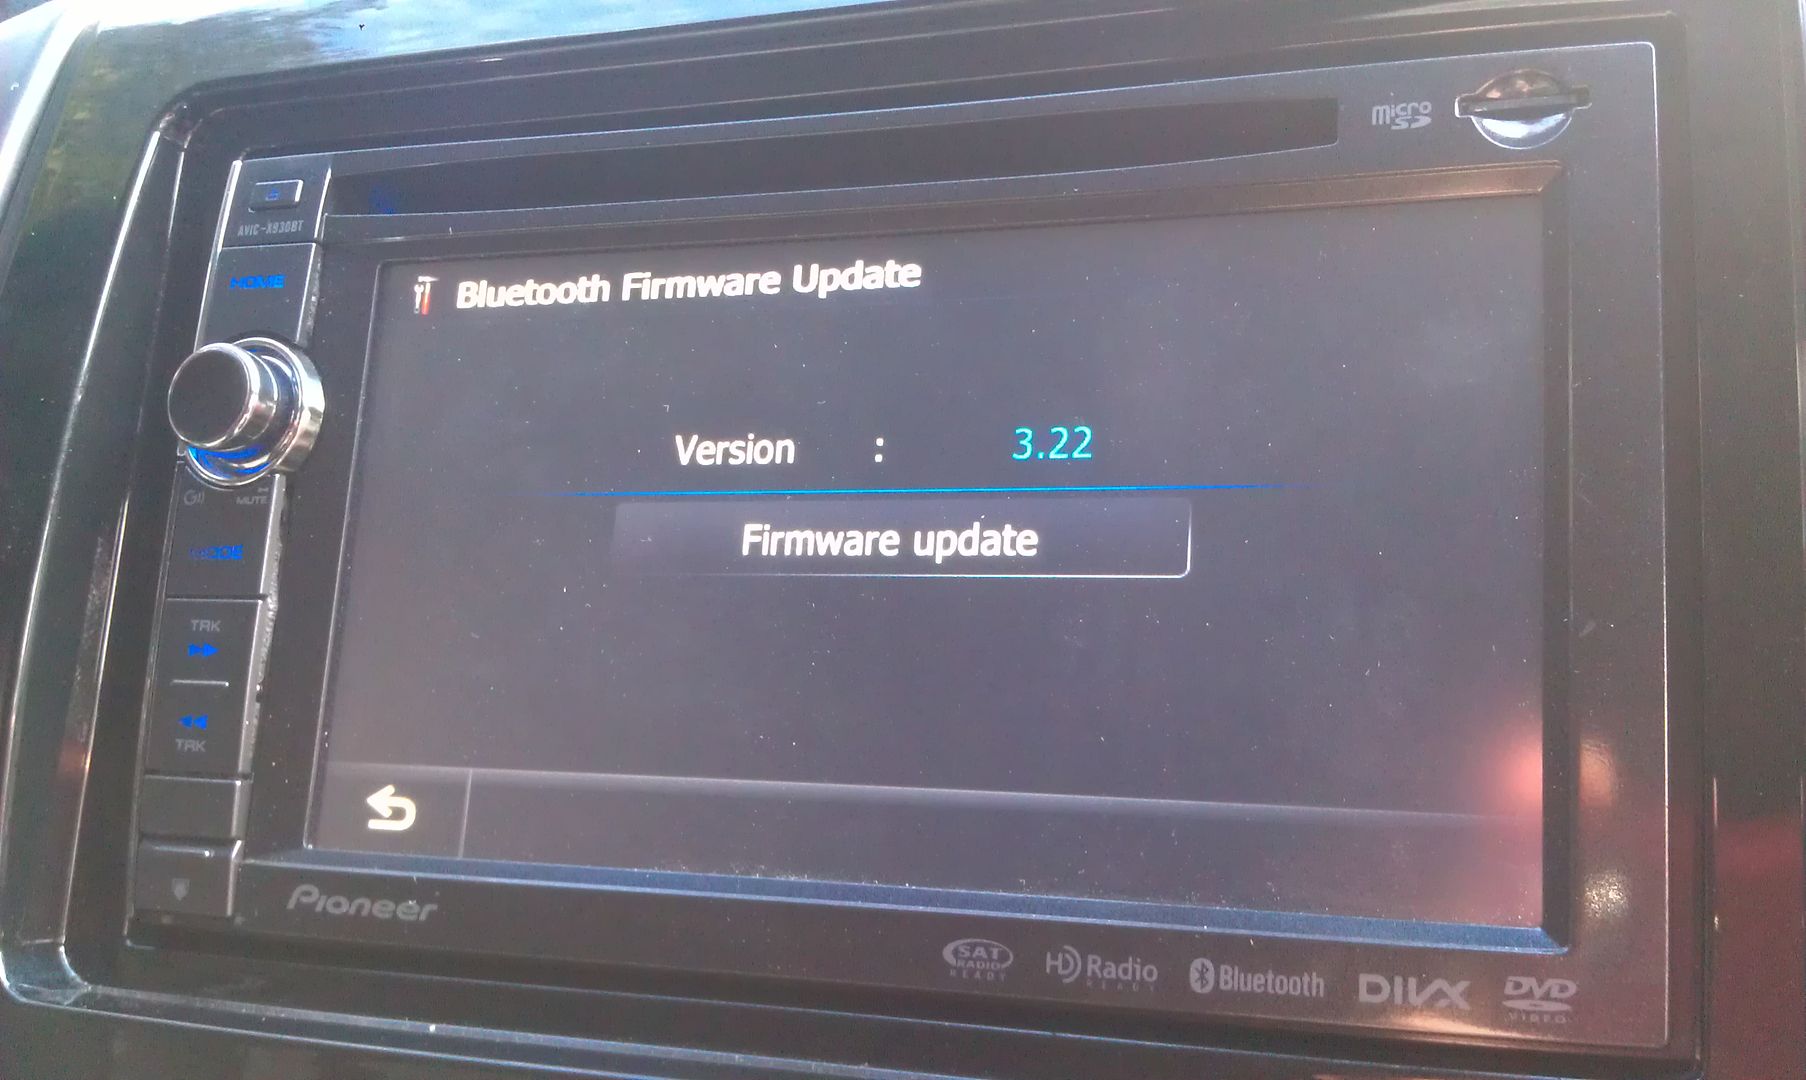
To update the bluetooth firmware, go into your settings menu
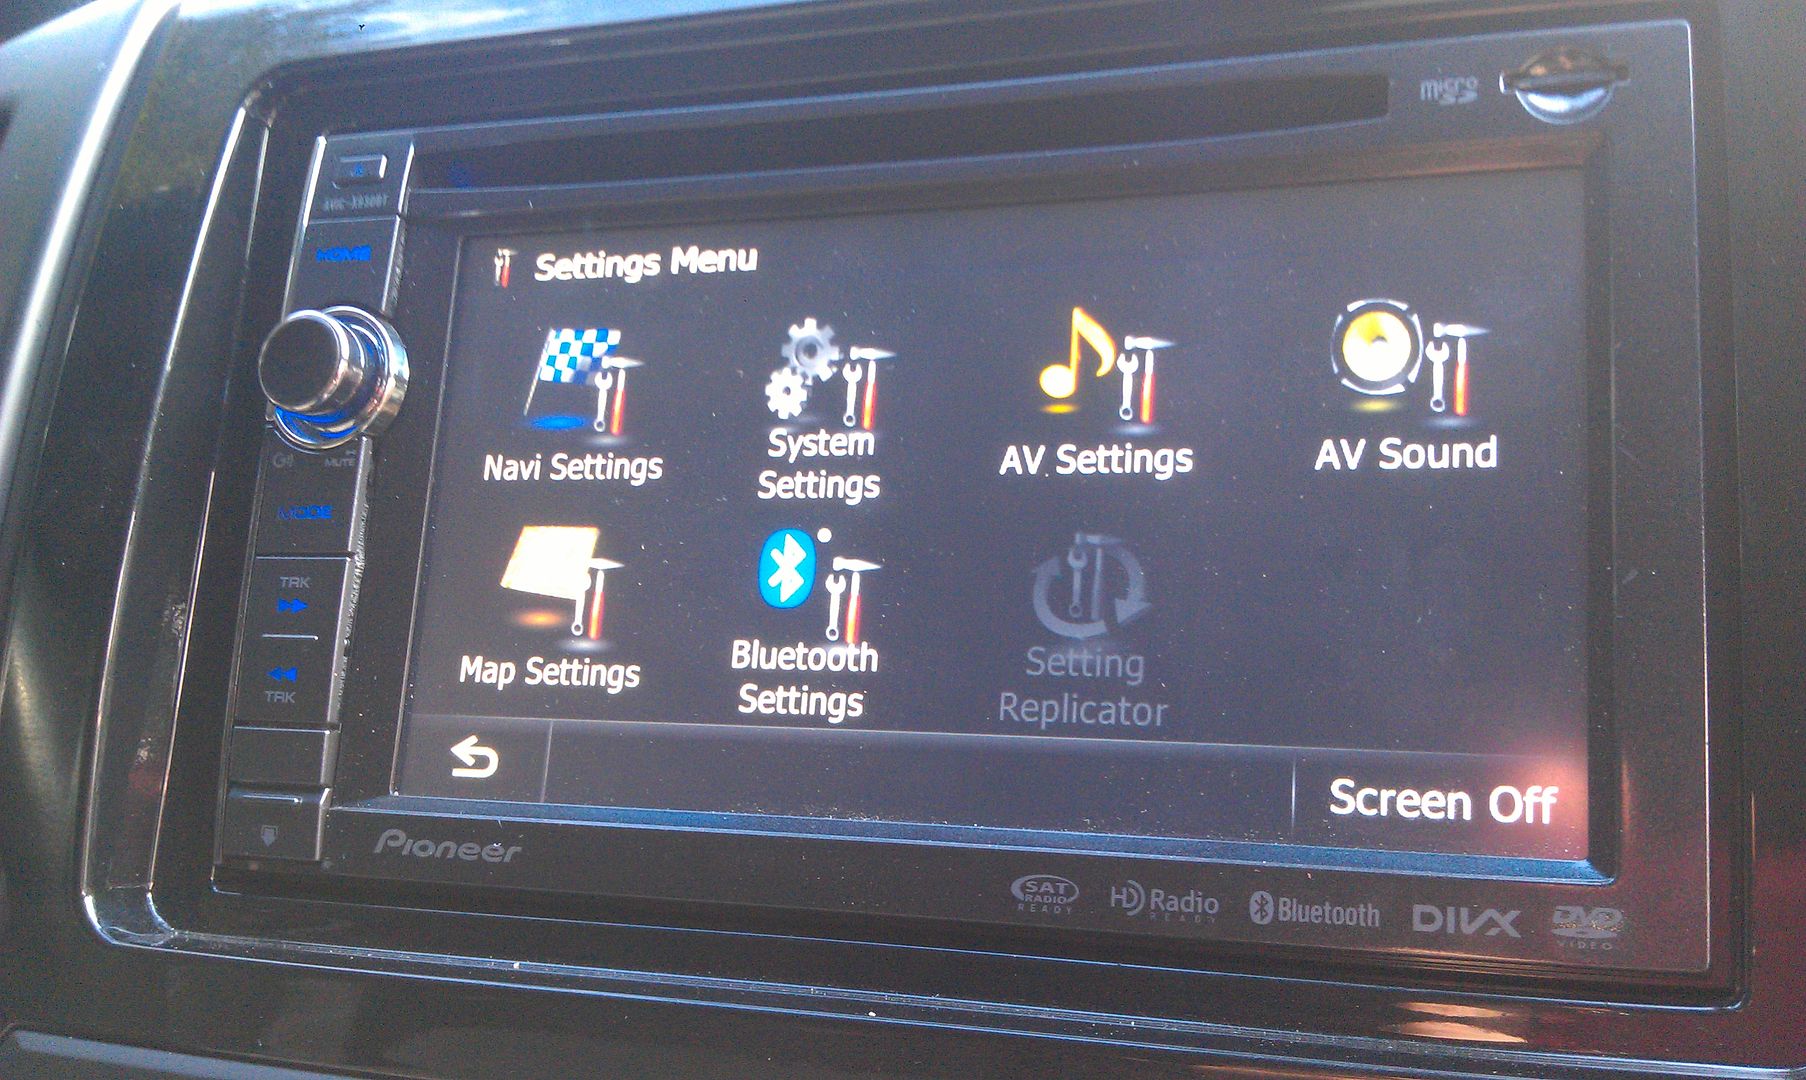
Go into the bluetooth settings menu, and scroll to the bottom where you'll find the firmware update option
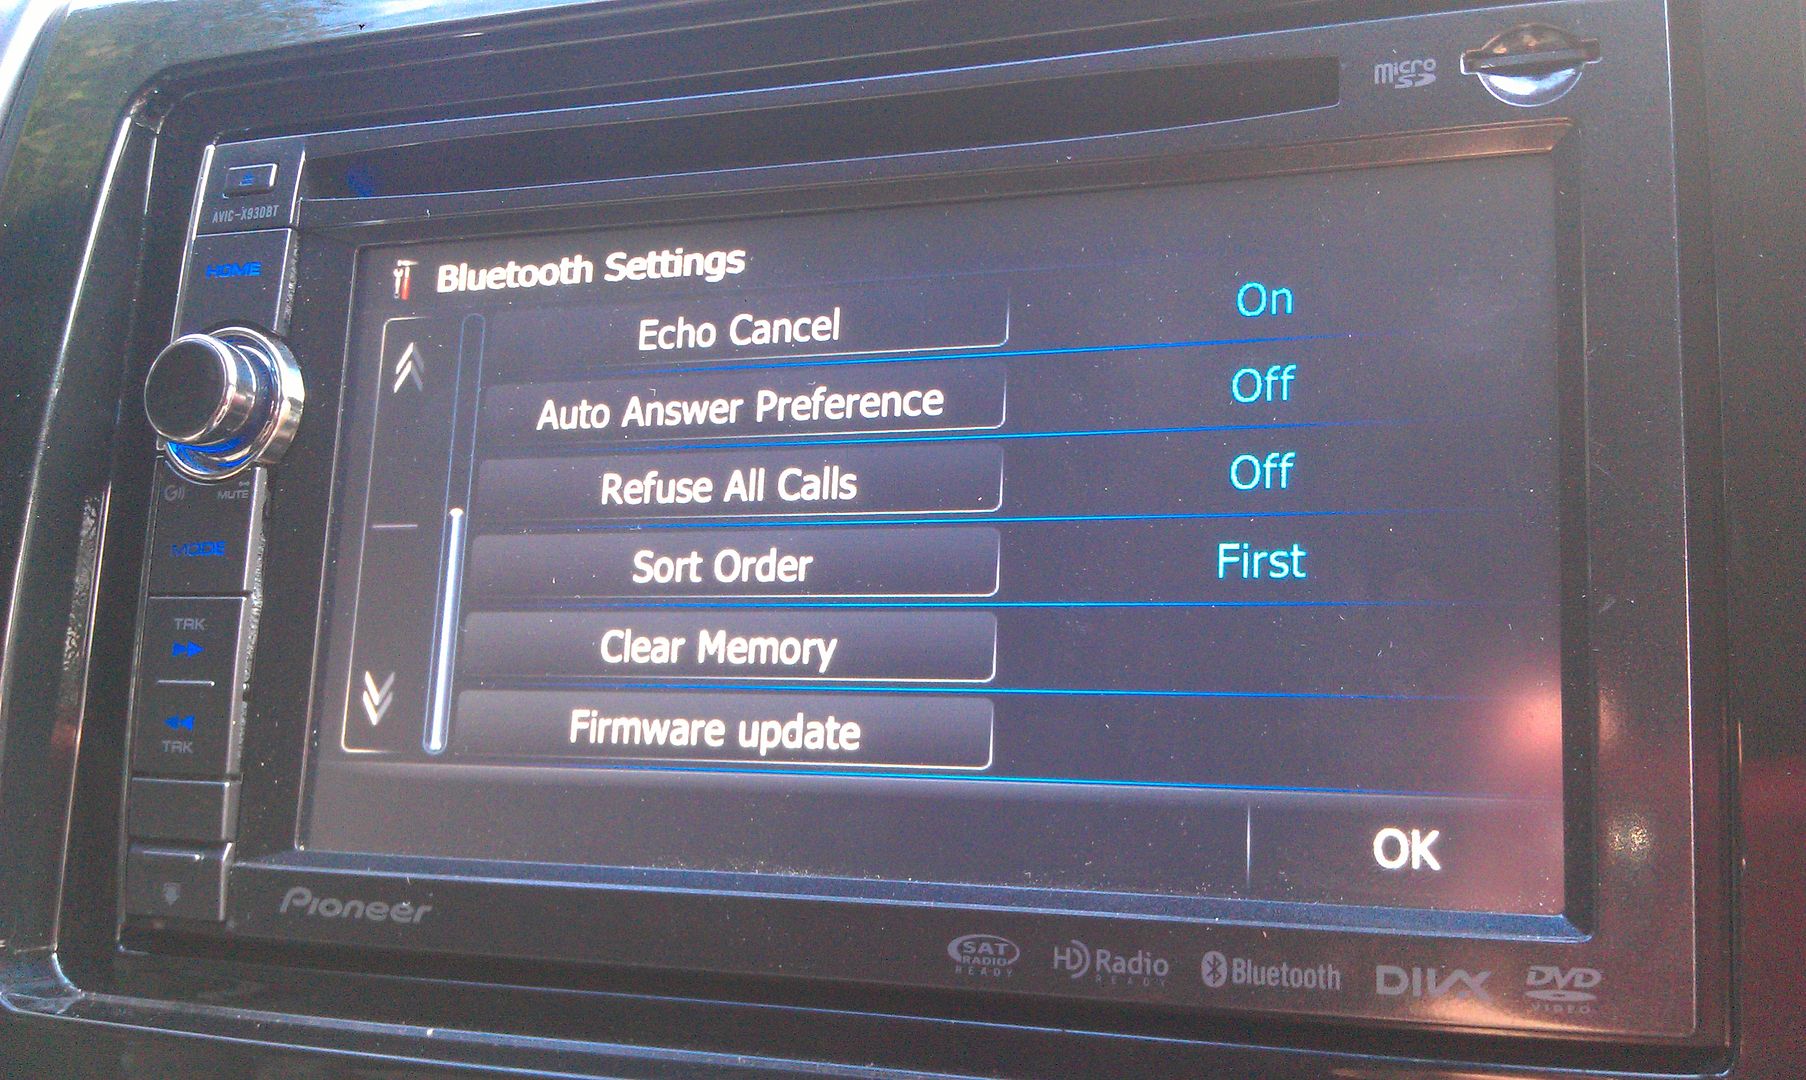
Press it and it'll show you your current firmware and under that will be the option to update it
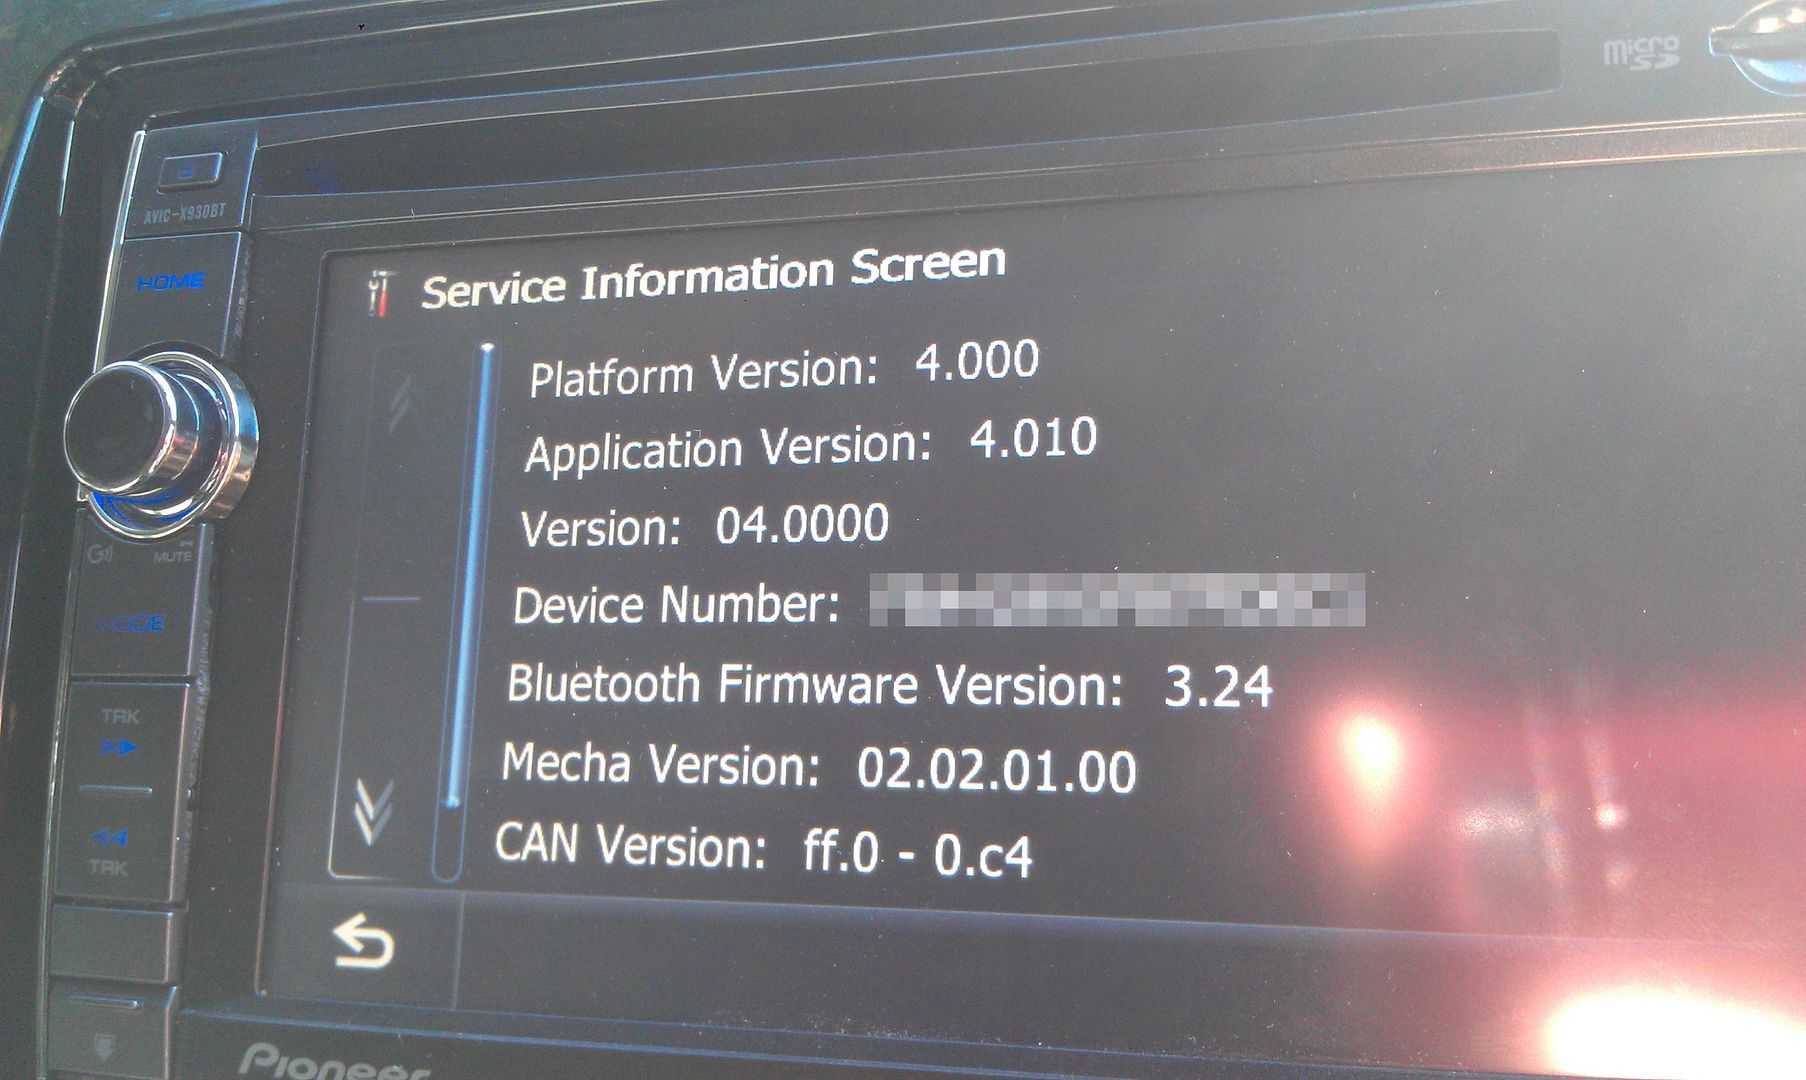
Once that's pressed, you're prompted with one more confirmation of the update showing you version info of what you're currently running and what's going to be installed
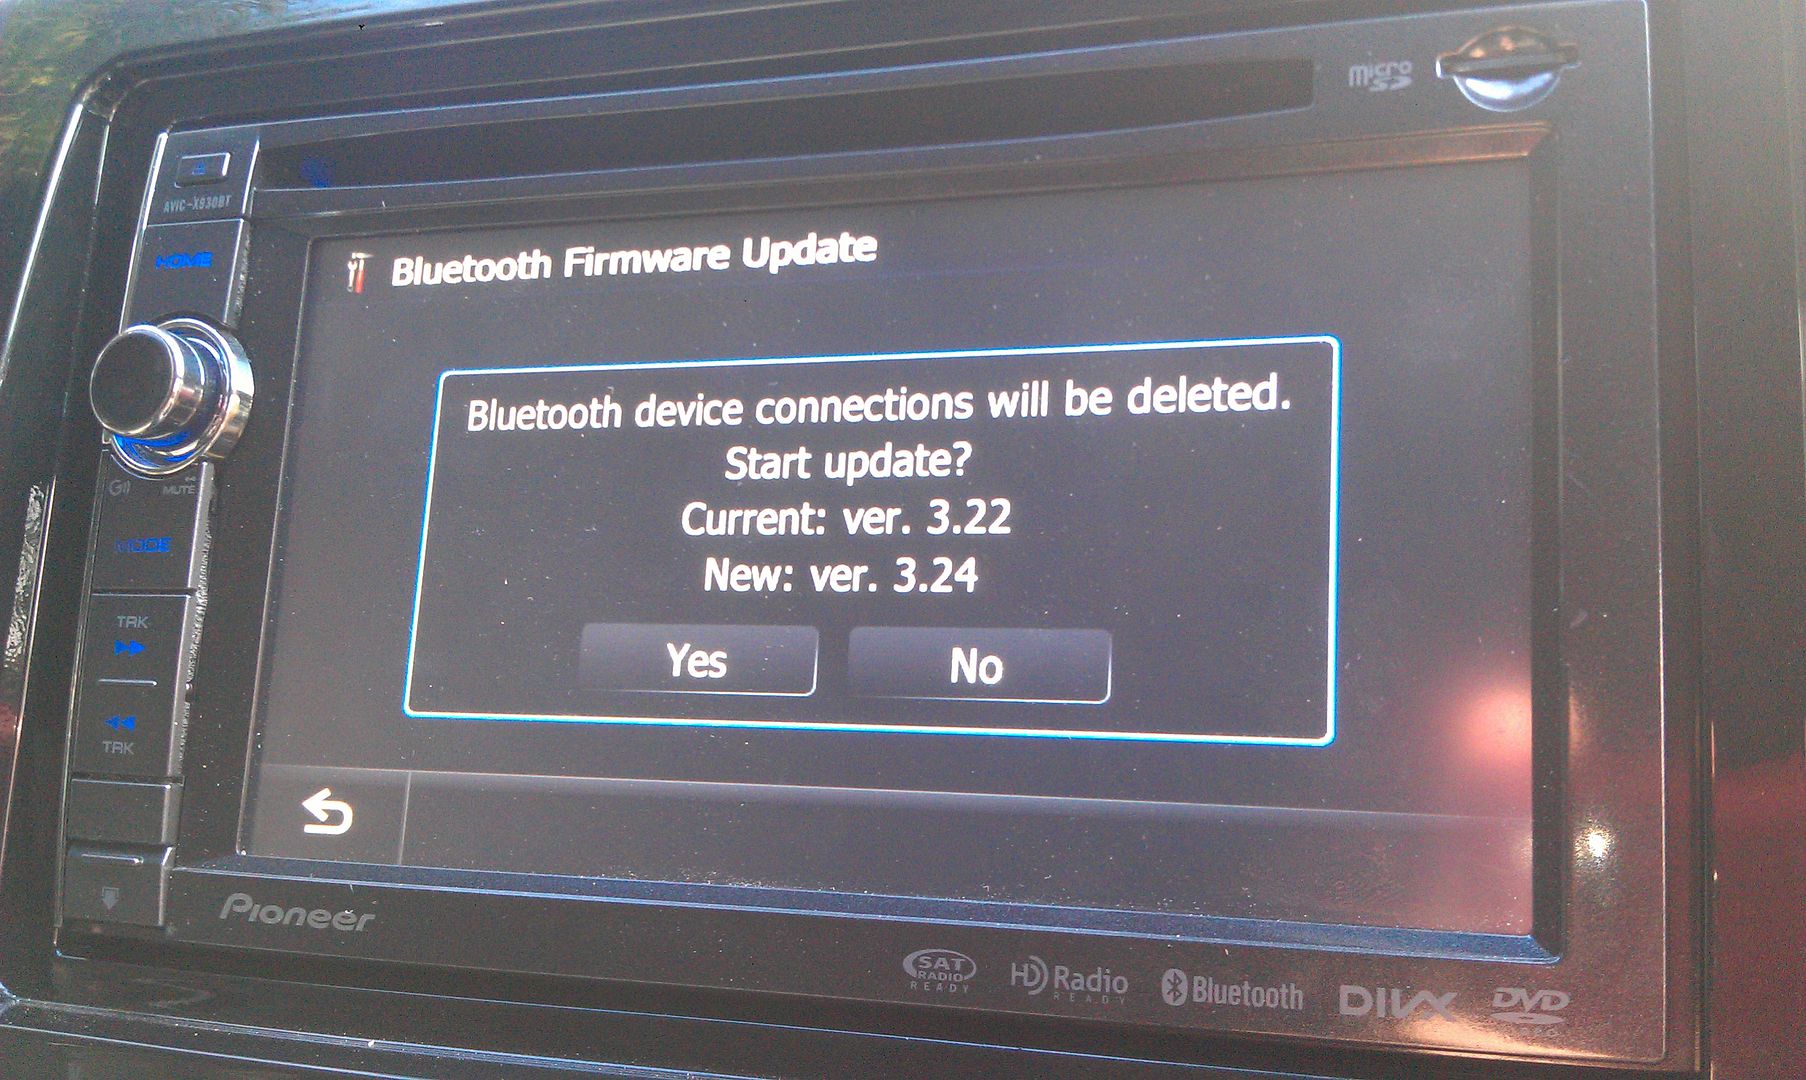
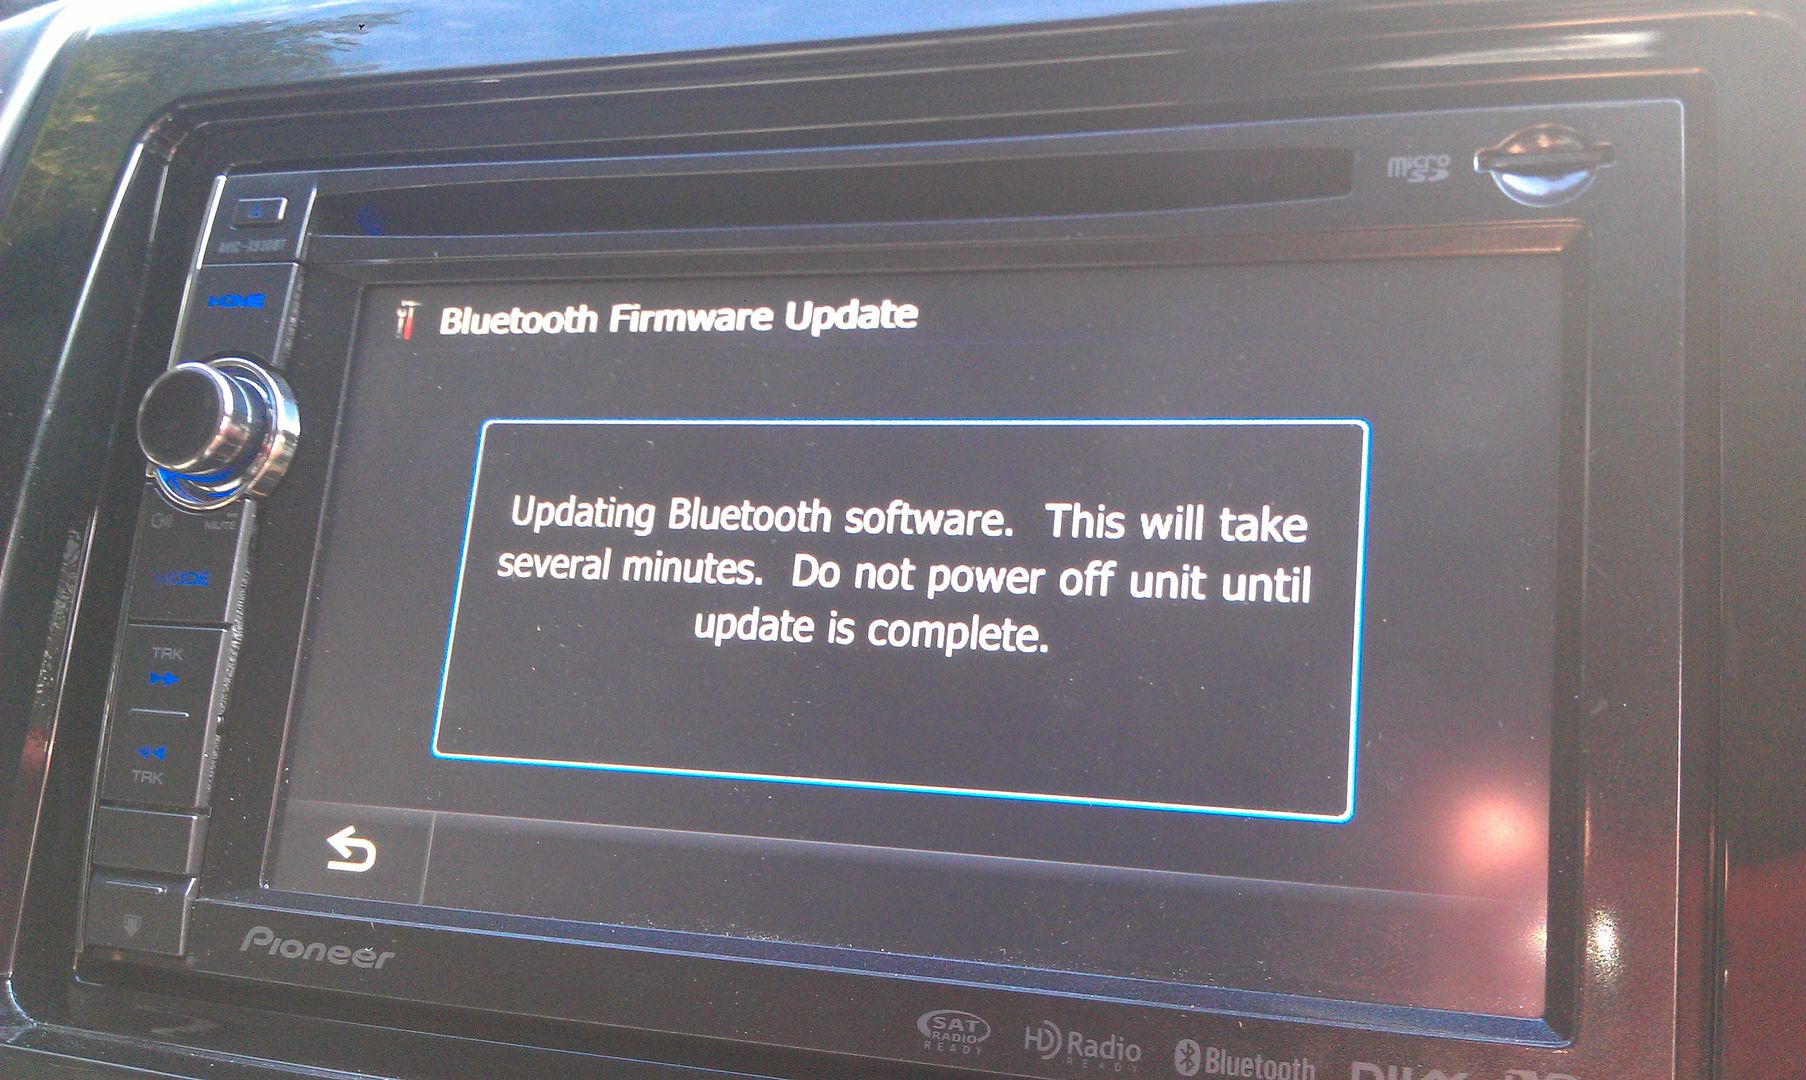
Hit yes and wait for it to update; takes about 3 or 4 minutes to complete
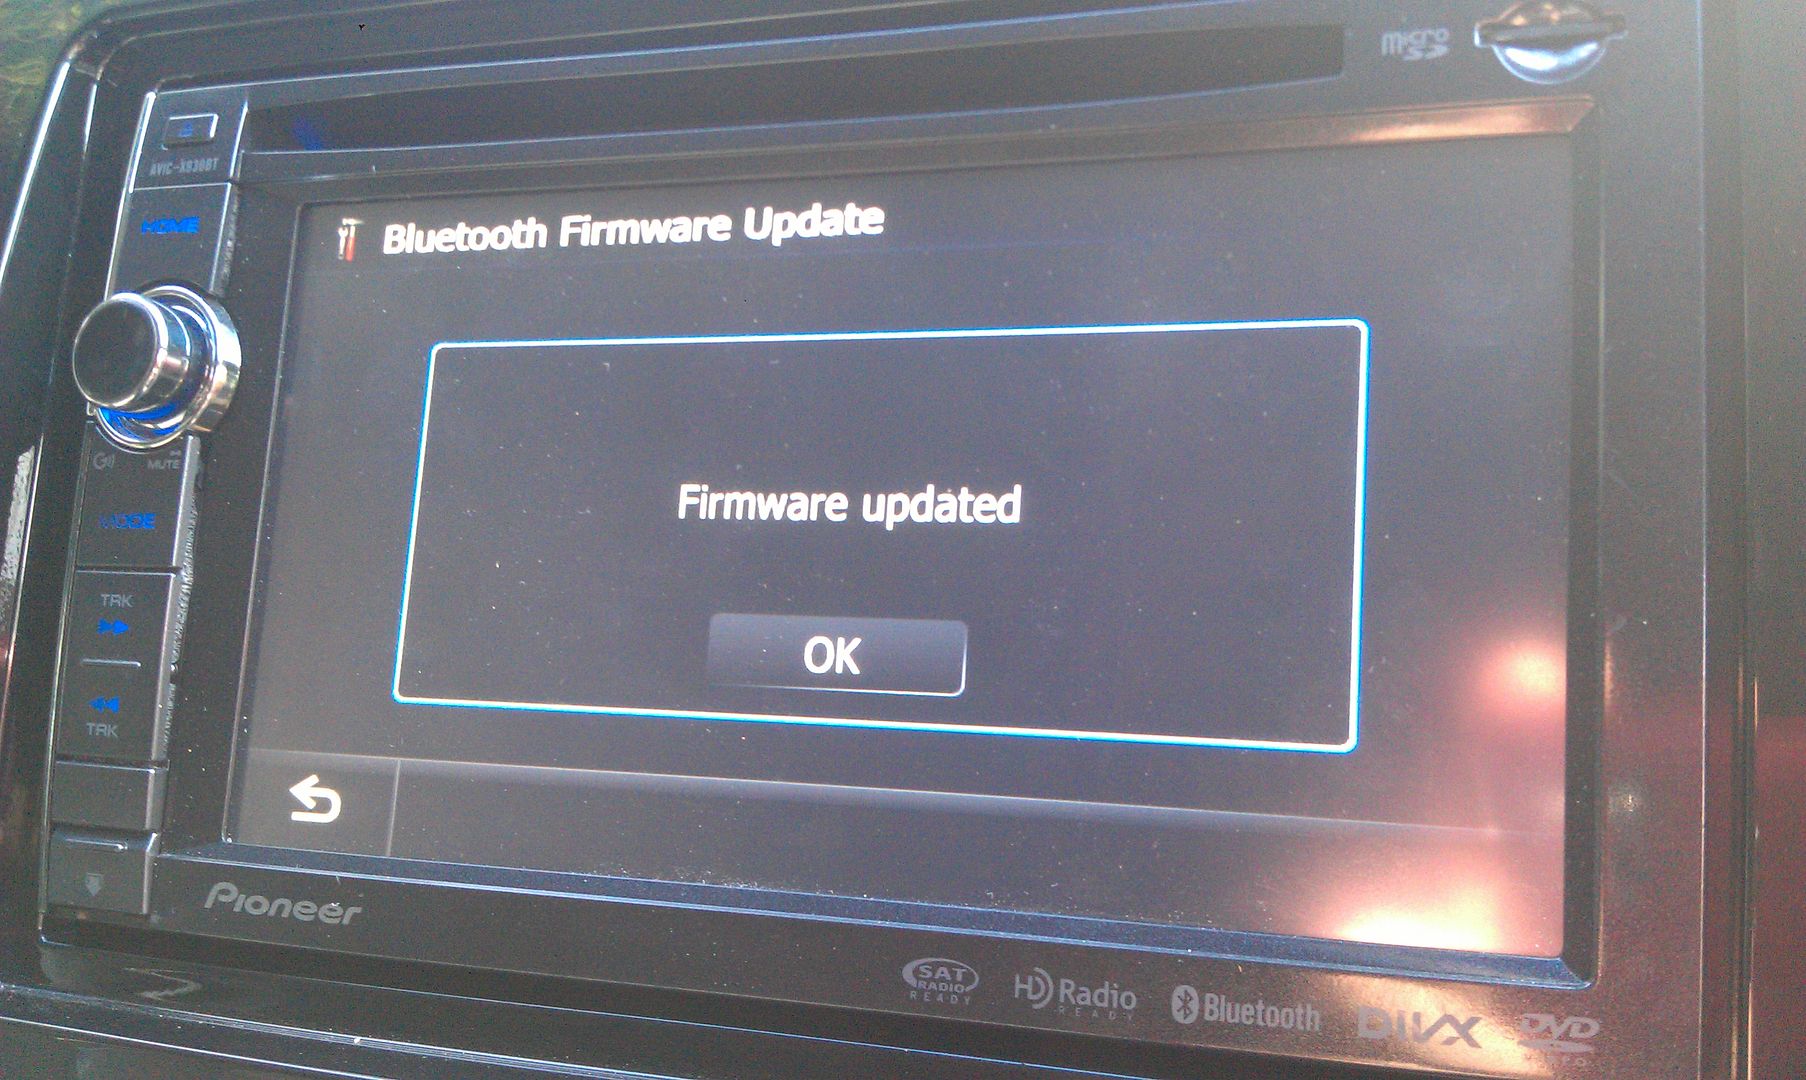
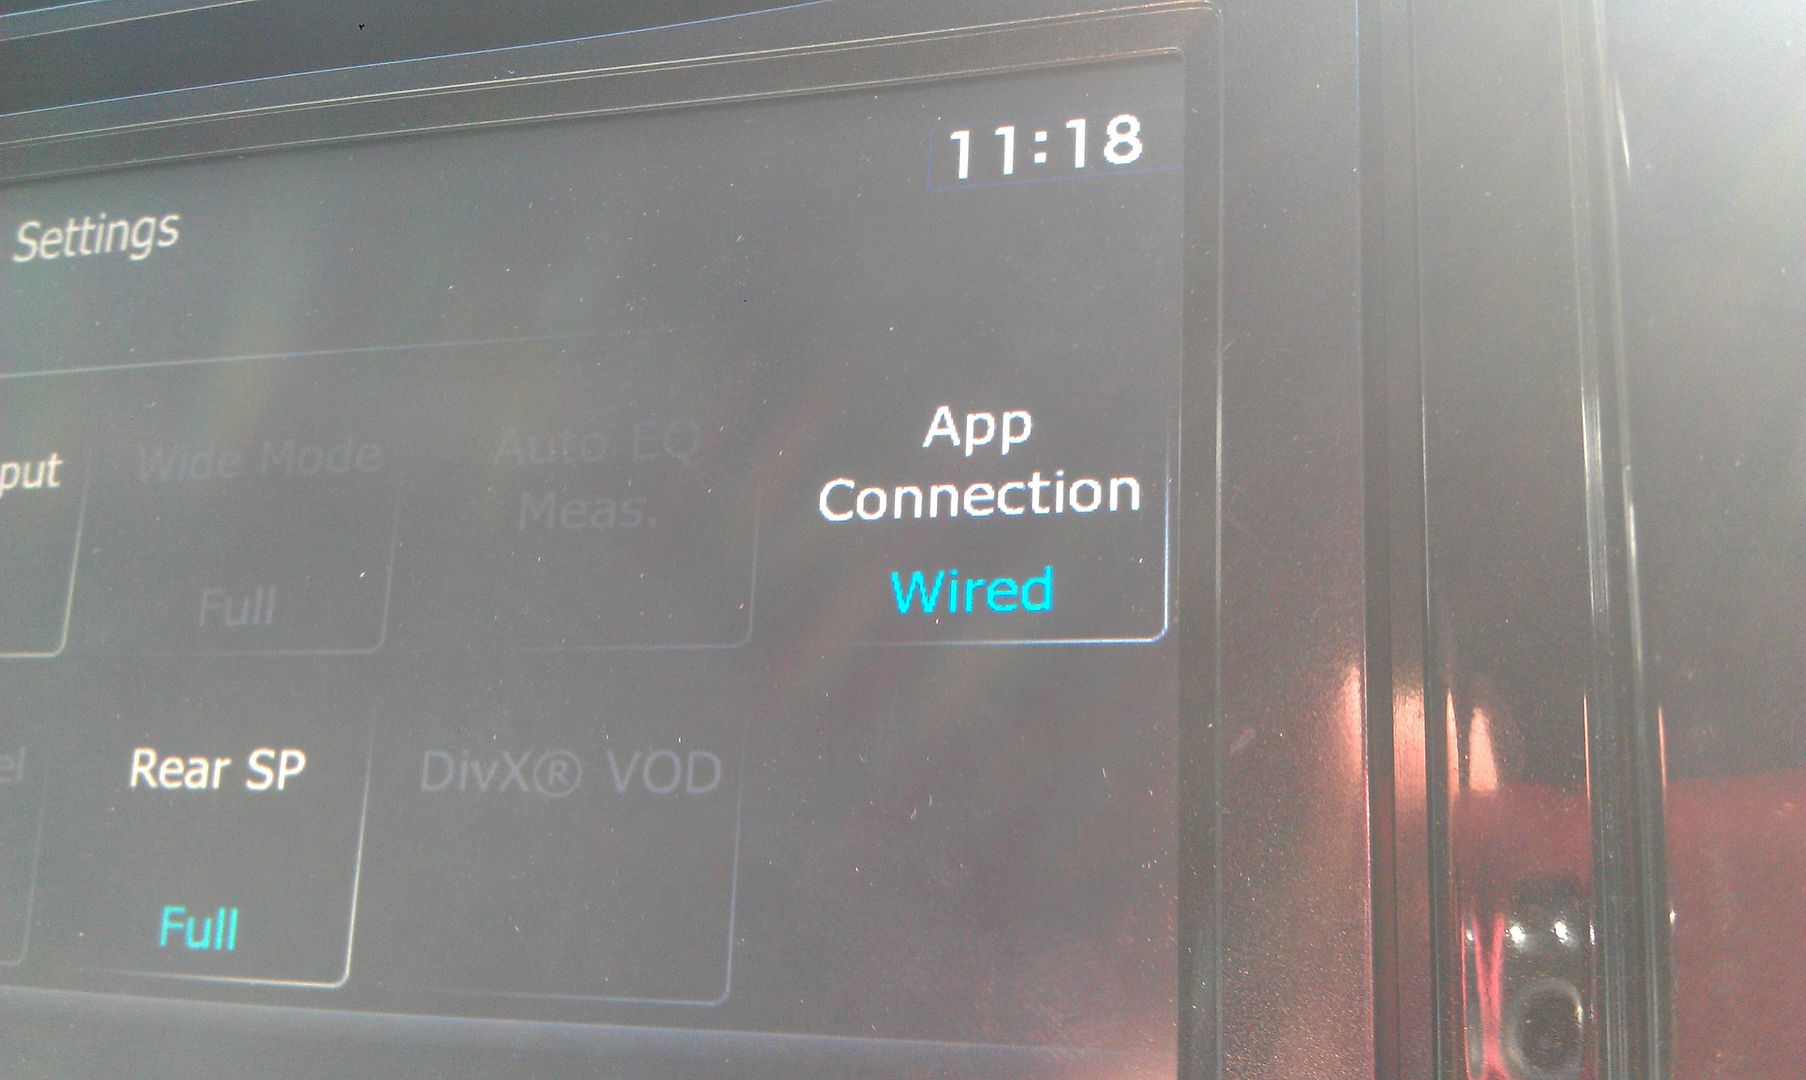
Once that's done, you'll have the new app connection option for bluetooth or wired connection
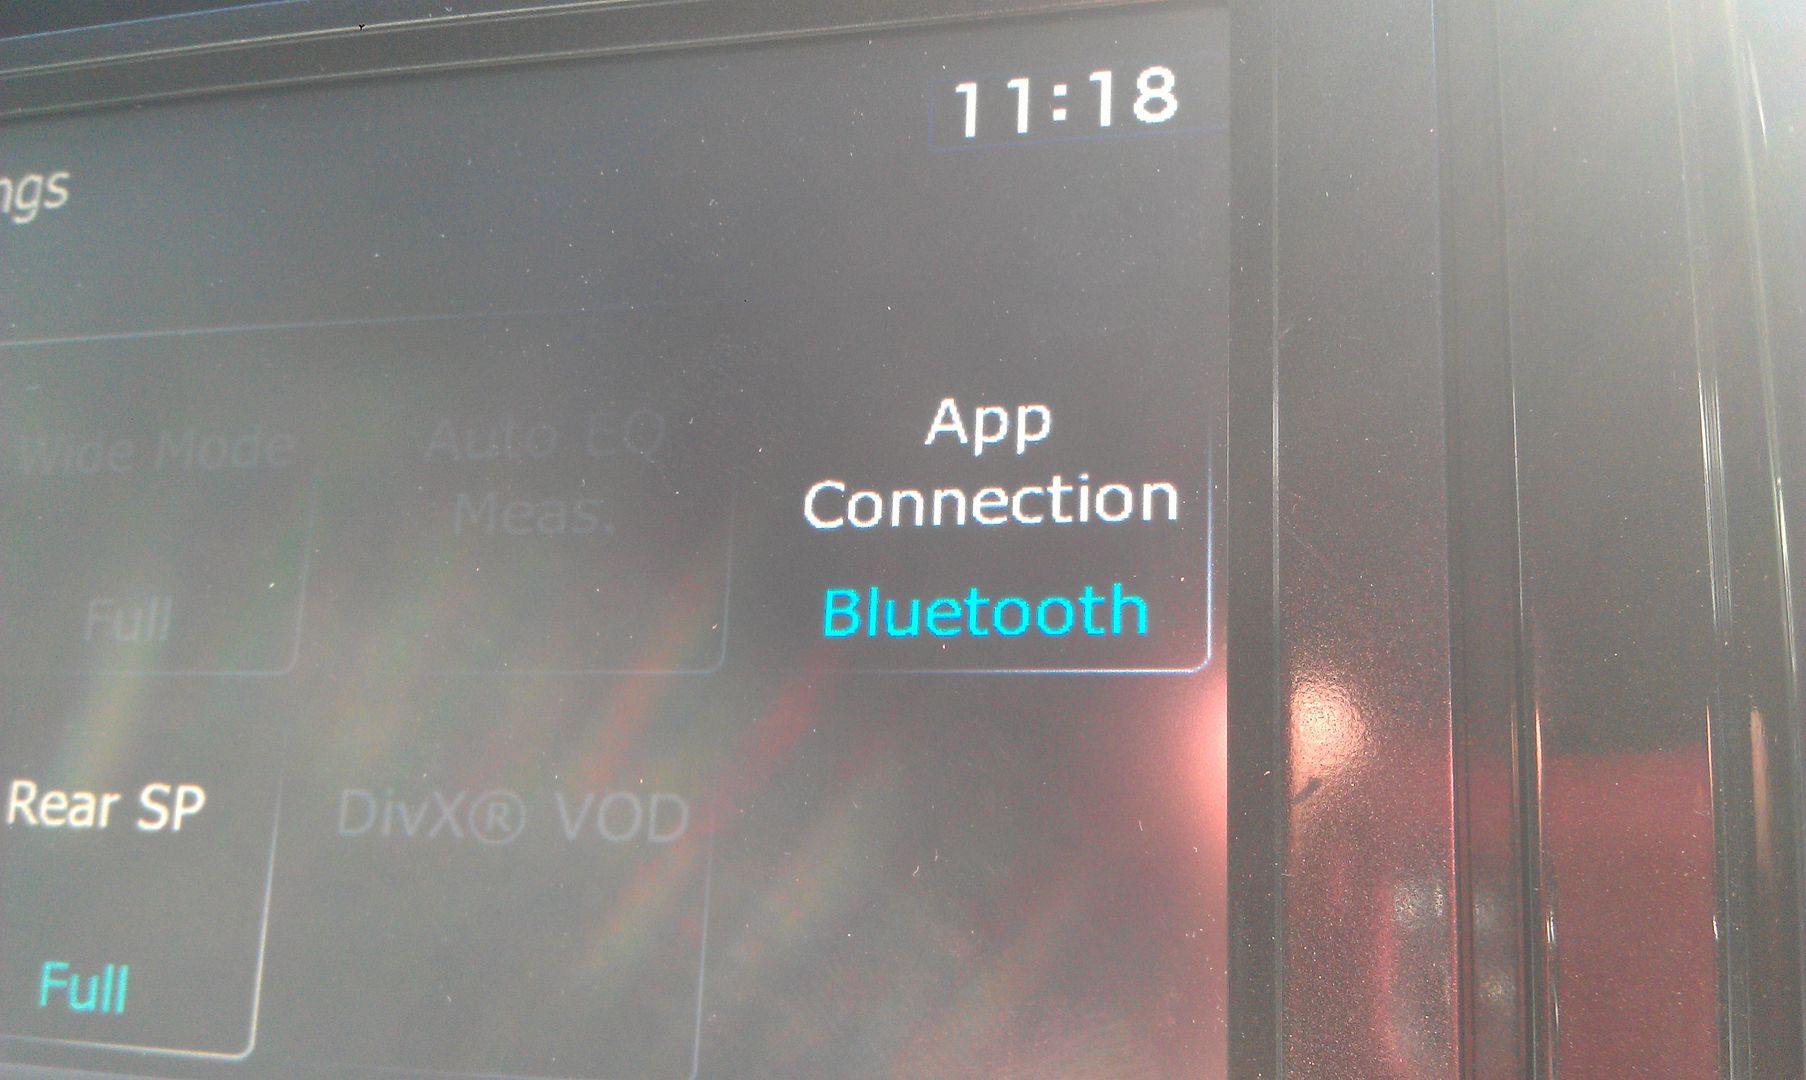
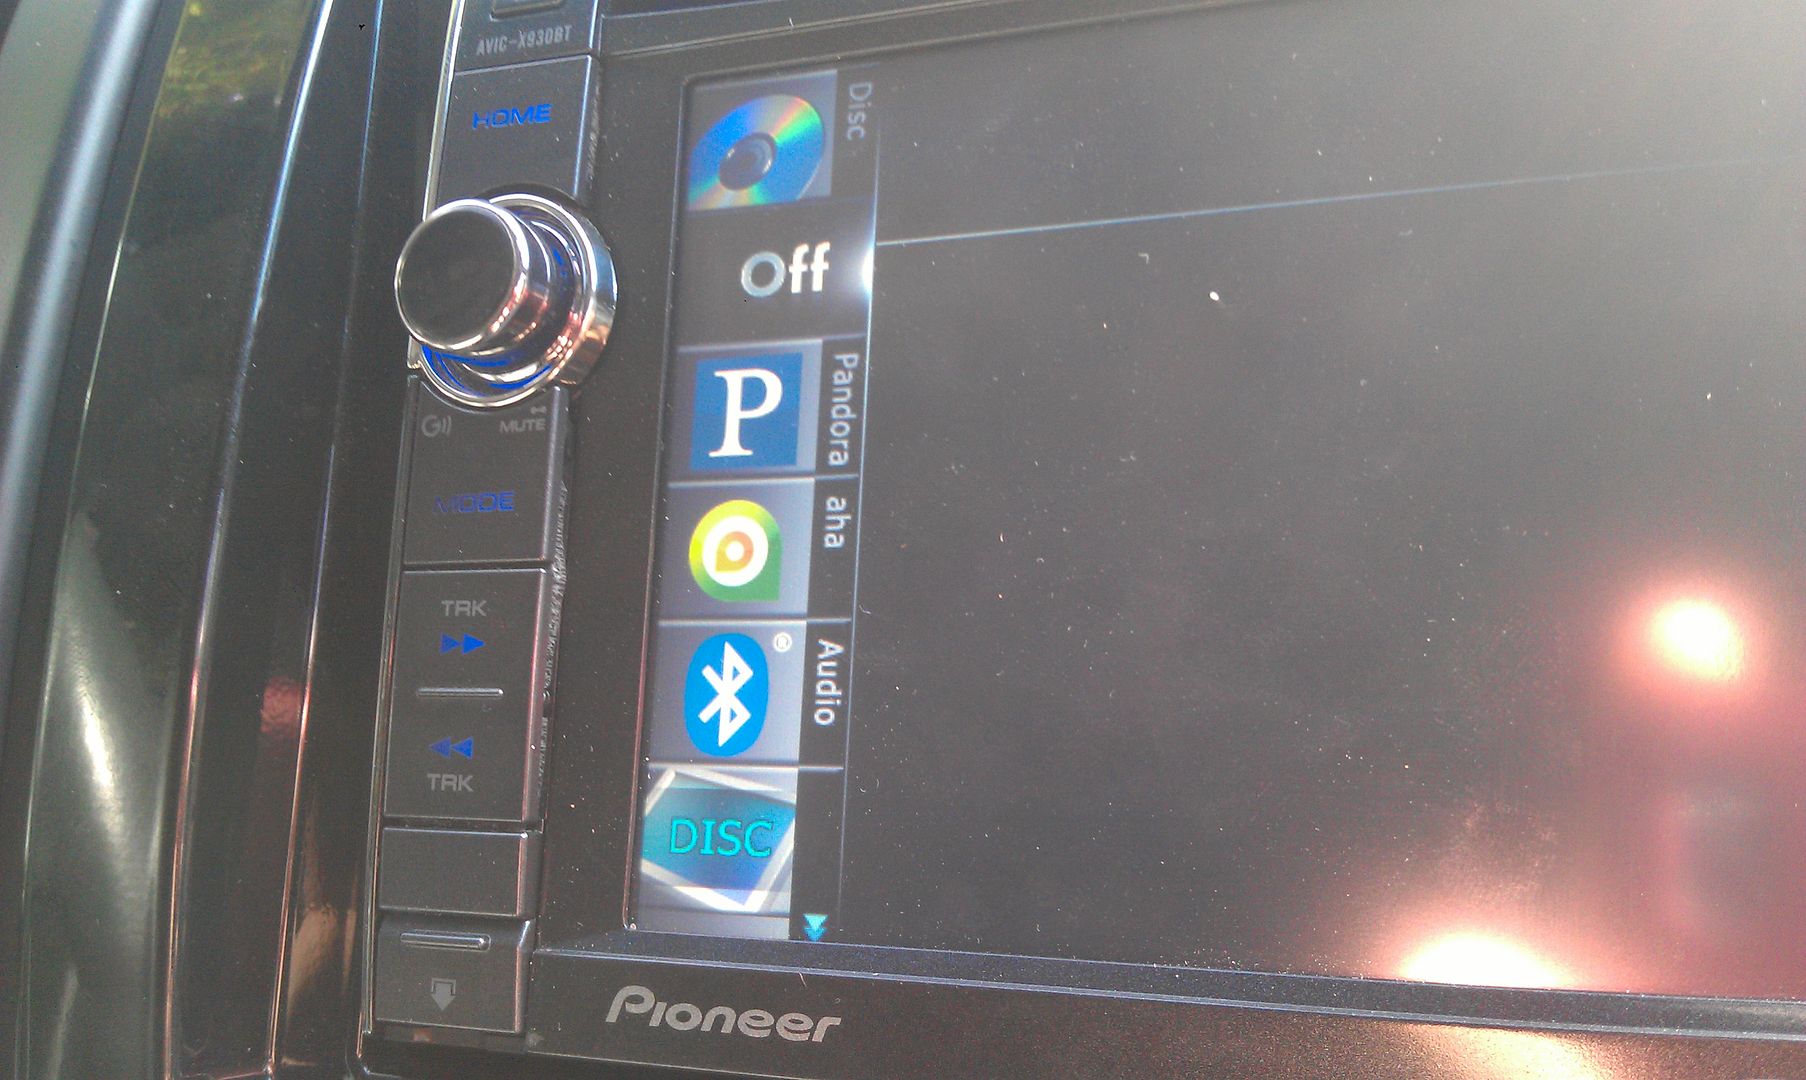
Pair to your Android phone (which you will have to do over again since you updated the bluetooth firmware which erased any stored phones) and you'll get a new list of options in you sources!
And for final proof of the successful update

Thanks for all the info and help everyone has given; this forum rocks!
Awesome work.... Thanks. Step by step with pics really helped.

[GUIDE] [X930BT/X940BT] - Remove 'CAUTION - SCREEN IMAGE MAY BE REVERSED' text overlay on backup camera
in Hacks/Mods
Posted
I want to get rid of the nag screen too. how to I remove the black caution screen. can you please explain in detail.
Thanks.