

f9uah
-
Content Count
5 -
Joined
-
Last visited
Content Type
Profiles
Forums
Blogs
Gallery
Posts posted by f9uah
-
-
On 12/19/2015 at 10:11 PM, asd255 said:
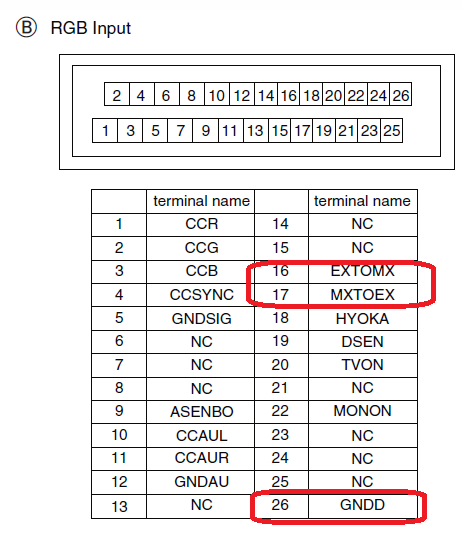
UART Connect(change bsp, android consol)
You can buy compatible USB-UART adapter ex. PL2303
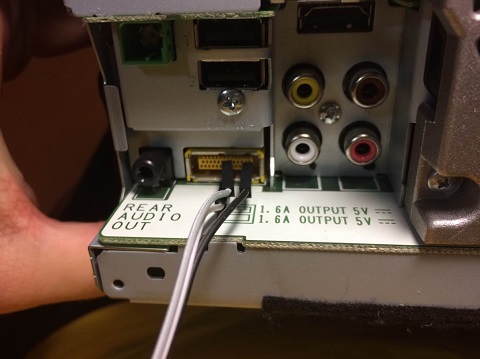
Just connect three wires (GND, TX, RX) from adapter to your head unit and you will get access to bootloader console where you can change BSP settings to restore boot process.TX - to EXTOMX (16)
RX - to MXTOEX (17)
GND - GND (26)Use the PuTTY terminal to connect to the console
115200 8N1you have a few seconds at the beginning that would press any button to enter the command.
you have 20 seconds to enter commands
U-Boot 2009.08 (Jan 06 2014 - 16:32:44)
CPU: Freescale i.MX6 family TO1.1 at 792 MHz
Thermal sensor with ratio = 174
Temperature: 25 C, calibration data 0x54e4a27d
mx6q pll1: 792MHz
mx6q pll2: 528MHz
mx6q pll3: 480MHz
mx6q pll8: 50MHz
ipg clock : 66000000Hz
ipg per clock : 66000000Hz
uart clock : 80000000Hz
cspi clock : 60000000Hz
ahb clock : 132000000Hz
axi clock : 198000000Hz
emi_slow clock: 99000000Hz
ddr clock : 396000000Hz
usdhc1 clock : 198000000Hz
usdhc2 clock : 198000000Hz
usdhc3 clock : 198000000Hz
usdhc4 clock : 198000000Hz
nfc clock : 24000000Hz
Board: i.MX6DL/Solo-JUPITER: unknown-board Board: 0x61011 [POR ]
Boot Device: NOR
I2C: ready
DRAM: 1 GB
Flash: 8 MB
MMC: FSL_USDHC: 0,FSL_USDHC: 1,FSL_USDHC: 2
Using default environmentIn: serial
Out: serial
Err: serial
***** display DDR calibration result *****
***************************************
Display result(register) of WriteLevelingMMDC registers updated from WriteLeveling
MPWLDECTRL0 (0x021b080c) = 0x002E0037
MPWLDECTRL1 (0x021b0810) = 0x00150017
***************************************
Display result(register) of DDR calibrationMMDC registers updated from calibration
Read DQS Gating calibration
MPDGCTRL0 PHY0 (0x021b083c) = 0x421B0215
MPDGCTRL1 PHY0 (0x021b0840) = 0x015F0167Read calibration
MPRDDLCTL PHY0 (0x021b0848) = 0x44494848Write calibration
MPWRDLCTL PHY0 (0x021b0850) = 0x3F3F3F37
***************************************
Net: got MAC address from IIM: 00:00:00:00:00:00
FEC0 [PRIME]
BSP A is valid
BSP B is valid
imx6 core num: 1
BSP A is valid
BSP B is valid
main loop boot env = 0
Hit any key to stop autoboot: 0
MX6SDL JUPITER KT 4.2.2 U-Boot > <INTERRUPT>
MX6SDL JUPITER KT 4.2.2 U-Boot >sdfsdf
List command: help
MX6SDL JUPITER KT 4.2.2 U-Boot > help
? - alias for 'help'
autoscr - DEPRECATED - use "source" command instead
base - print or set address offset
bdinfo - print Board Info structure
bmp - manipulate BMP image data
boot - boot default, i.e., run 'bootcmd'
bootd - boot default, i.e., run 'bootcmd'
booti - booti - boot android bootimg from memorybootm - boot application image from memory
bootp - boot image via network using BOOTP/TFTP protocol
bsp - get bsp info, or set bsp infoclear_bootf- clear Warp!! bootflag
clk - Clock sub system
cls - clear screen
cmp - memory compare
coninfo - print console devices and information
cp - memory copy
crc32 - checksum calculation
dhcp - boot image via network using DHCP/TFTP protocol
download_mode- download_mode - enter i.MX serial/usb download mode
echo - echo args to console
erase - erase FLASH memory
ext2load- load binary file from a Ext2 filesystem
ext2ls - list files in a directory (default /)
fatinfo - print information about filesystem
fatload - load binary file from a dos filesystem
fatls - list files in a directory (default /)
flinfo - print FLASH memory information
go - start application at address 'addr'
help - print online help
i2c - I2C sub-system
iminfo - print header information for application image
imxotp - One-Time Programable sub-system
imxtract- extract a part of a multi-image
itest - return true/false on integer compare
loadb - load binary file over serial line (kermit mode)
loads - load S-Record file over serial line
loady - load binary file over serial line (ymodem mode)
loop - infinite loop on address range
md - memory display
memchk - memory check
mii - MII utility commands
mm - memory modify (auto-incrementing address)
mmc - MMC sub system
mmcinfo - display MMC info
model - get model info, or set model info.mtest - simple RAM read/write test
mw - memory write (fill)
nfs - boot image via network using NFS protocol
nm - memory modify (constant address)
ping - send ICMP ECHO_REQUEST to network host
printenv- print environment variables
protect - enable or disable FLASH write protection
rarpboot- boot image via network using RARP/TFTP protocol
regul - Regulator sub system
reset - Perform RESET of the CPU
run - run commands in an environment variable
setenv - set environment variables
sf - SPI flash sub-system
sleep - delay execution for some time
source - run script from memory
sspi - SPI utility commands
tftpboot- boot image via network using TFTP protocol
version - print monitor version
warp - Warp!! bootasfasfsa
help bsp
MX6SDL JUPITER KT 4.2.2 U-Boot > help bsp
bsp - get bsp info, or set bsp info
Usage:
bsp Usage:
bsp init - init bsp information to init value
bsp get - get bsp information from nor flash
bsp passwd <passwd> - set sd card password (16bytes)
bsp set <item> <value> - set bsp information to nor flash
item
-m: set boot mode
value
0: Normal
1: Recovery
2: EasyRecovery(CopyDevice)
3: Re-EasyRecovery
-l: set launch mode flag
value
0: APL
1: TestMode.apk
2: Slave TestMode
3: Boot Error
-t: set TestMode Sub Mode
value
0: Tech Mode
1: Serv Mode
2: TestMode_A.key
-b: set bootimage active side flag
value
0: Side A
1: Side B
-r: set recoveryimage active side flag
value
0: Side A
1: Side B
-d: set debug on/off switch
value
0: OFF
1: ON
-u: set usb otg switch
value
0: Host
1: Device
-c: set memchk flag
value
0: No
1: Yes
-w: set warp boot active side flag
value
0: Side A
1: Side B
-s: set boot sub mode flag
value
0: Normal
1: Catch snapshot
2: Warp
-f: set update flag
value
0: Recovery-Update
1: uboot update
2: boot.img update
3: recovery.img update
4: system.img update
5: opening data update
6: UI update
7: All image update
8: TESTMODE_N.KEY
9: easyrecovery copy
10: easyrecovery copy&verify
11: password key copy&verify
12: easyrecovery mode change
-sf: set update sub flag
value
0: SD Card
1: USB1
2: USB2
-uif: set ui update flag
value
0: non-updating
1: updatingMX6SDL JUPITER KT 4.2.2 U-Boot >
BSP get
MX6SDL JUPITER KT 4.2.2 U-Boot > bsp get
BSP A is valid
BSP B is valid
## A Side BSP Information:
Magic Number :0xa55a5aa5(a55a5aa5:Valid, other:Invalid)
Boot Mode :0x00000000(0:Normal,
1:Recovery,
2:EasyRecovery,
3:Re-EasyRecovery,
default:Normal)
Launch Mode :0x00000000(0:APL,
1:TestMode.apk,
2:Slave TestMode,
3:Boot Error,
default:APL)
TestMode Sub-Mode :0x00000000(0:TextMode_A.key, 1:Serv Mode, 2:Tech Mode, default: Tech Mode)
Bootimage Side :0x00000000(0:Side A, 1:Side B, default: Side A)
Recoveryimage Side :0x00000000(0:Side A, 1:Side B, default: Side A)
Debug Switch :0x00000002(0:OFF, 1:ON, default: OFF)
Usb OTG Switch :0x00000000(0:Host, 1:Device, default: Host)
Memchk flag :0x00000000(0:No, 1:Yes, default: No)
Warp boot :0x00000000(0:Side A, 1:Side B, default: Side A)
Boot Sub-Mode :0x00000002(0:Normal, 1:Catch snapshot, 2:Warp, default: Normal)
Update flag :0x0000000c(0:Recovery-Update,
1:uboot update,
2:boot.img update,
3:recovery.img update,
4:system.img update,
5:opening data update,
6:UI update,
7:All image update,
8:TESTMODE_N.KEY,
9:easyrecovery copy,
a:easyrecovery copy&verify,
b:password key copy&verify,
c:easyrecovery mode change,
default:Recovery-Update)
Update sub-flag :0x00000001(0:SD Card, 1:USB1, 2:USB2 default: SD Card)
UI Update flag :0x00000000(0:non-updating, 1:updating, default:non-updating)
Reserved1 flag :0xffffffff(default:0xFFFFFFFF)
Reserved2 flag :0xffffffff(default:0xFFFFFFFF)
## B Side BSP Information:
Magic Number :0xa55a5aa5(a55a5aa5:Valid, other:Invalid)
Boot Mode :0x00000000(0:Normal,
1:Recovery,
2:EasyRecovery,
3:Re-EasyRecovery,
default:Normal)
Launch Mode :0x00000000(0:APL,
1:TestMode.apk,
2:Slave TestMode,
3:Boot Error,
default:APL)
TestMode Sub-Mode :0x00000000(0:TextMode_A.key, 1:Serv Mode, 2:Tech Mode, default: Tech Mode)
Bootimage Side :0x00000000(0:Side A, 1:Side B, default: Side A)
Recoveryimage Side :0x00000000(0:Side A, 1:Side B, default: Side A)
Debug Switch :0x00000002(0:OFF, 1:ON, default: OFF)
Usb OTG Switch :0x00000000(0:Host, 1:Device, default: Host)
Memchk flag :0x00000000(0:No, 1:Yes, default: No)
Warp boot :0x00000000(0:Side A, 1:Side B, default: Side A)
Boot Sub-Mode :0x00000002(0:Normal, 1:Catch snapshot, 2:Warp, default: Normal)
Update flag :0x0000000c(0:Recovery-Update,
1:uboot update,
2:boot.img update,
3:recovery.img update,
4:system.img update,
5:opening data update,
6:UI update,
7:All image update,
8:TESTMODE_N.KEY,
9:easyrecovery copy,
a:easyrecovery copy&verify,
b:password key copy&verify,
c:easyrecovery mode change,
default:Recovery-Update)
Update sub-flag :0x00000001(0:SD Card, 1:USB1, 2:USB2, default: SD Card)
UI Update flag :0x00000000(0:non-updating, 1:updating, default:non-updating)
Reserved1 flag :0xffffffff(default:0xFFFFFFFF)
Reserved2 flag :0xffffffff(default:0xFFFFFFFF)
MX6SDL JUPITER KT 4.2.2 U-Boot >
If you have an error while updating the firmware.
Replacing the SD card will not solve the problem.
You need to change the boot from Recovery to Normal
set boot mode "normal"bsp set -m 0
if you used "Catch snapshot" from Debug Menu - cyclic reboots
set boot sub mode flag "normal"bsp set -s 0
......
-
On 7/13/2021 at 1:19 PM, slackwaredragon said:
[7/13/2021 update - Part 2 added, see second post]
I've gotten a bunch of messages and gave a few empty promises (sorry guys) that I'd write this up. Life got busy and I haven't had time to tinker with my w4500nex, especially since I traded in my Jeep for a well-equipped Ram (that 12" screen is both awesome and underwhelming). I haven't played with this since but I figured at the very least I could give you a how-to so you could get your radios back online and hopefully someone can build upon my work and make these things really powerful. The software might suck, but the audio hardware and features are a lot better than many of the android models you find on eBay. I've broken this up into 3 sections; how to build a working SDcard from an readily available image using Linux, how to dive deeper down the rabbit hole to tinker with the NEX series and finally some thoughts and final notes.
Quick note of warning: Proceed at your own risk, opening up the device will void your warranty which is probably dead anyways. I'm not responsible for modifications you make to your radio. Something will probably go wrong. You might violate laws in your area. Going 88mph may or may not send you back through time - I hold no responsibilities for time paradoxes.
To get started… "My SDCard Died in my w4500nex, how do I fix it?"
What you'll need;- 8gb or 16gb SdCard that's SDHC. SDHC is important, smaller than 8gb or larger than 16gb cards may not work. Even the right size cards might not work, these things can be finicky. Once you write an image to the card and boot the headunit with it installed, it'll lock the sdcard to the unit and you won't be able to re-use it. Best to have a few different brands as spares to be safe.
-
SDCard reader (usb or internal).
- Bonus: If wanting to experiment with cmd42 (how the SDCards are locked) then know that it seems random on which SDCard readers actually support the CMD42 protocol. 4 of the readers I had did not, but a random chromebook did. Raspberry Pis also support CMD42.
- Linux desktop, laptop or Virtual Machine. I used Ubuntu. This can probably be done on Windows, but I prefer to use Linux when working with Linux-based operating systems.
- Tools and instructions on how to open the NEX radio. (If someone is kind enough to post opening instructions, I'll link them here.)
How to make your own SDCard using the W4400NEX image and get a working touchscreen (read section 3 for more info on why this is necessary)
- Download the AVH-W4400NEX v1.02 image from this thread (http://avic411.com/index.php?/topic/82490-backups-and-images/page/8/ - first post on that link, the filename should be AVIC.zip).
- Copy the file to your Linux machine if it's not already there and unzip the archive. You should see a file named AVIC.img. You'll need to mount this IMG file in Linux, access one of the partitions and change the sysd.conf file
-
Before mounting, make sure it's a valid image by using fdisk (fdisk -u -l .\AVIC.img). If you're using the file I linked above, it should have the same output as the below.
Disk ./AVIC.img: 7.53 GiB, 8068792320 bytes, 15759360 sectors Units: sectors of 1 * 512 = 512 bytes Sector size (logical/physical): 512 bytes / 512 bytes I/O size (minimum/optimal): 512 bytes / 512 bytes Disklabel type: dos Disk identifier: 0x95516e09 Device Boot Start End Sectors Size Id Type ./AVIC.img1 1050624 1071103 20480 10M 83 Linux ./AVIC.img2 1071104 1091583 20480 10M 83 Linux ./AVIC.img3 1091584 4622335 3530752 1.7G 5 Extended ./AVIC.img4 4622336 15042559 10420224 5G 83 Linux ./AVIC.img5 1091585 1153023 61439 30M 83 Linux ./AVIC.img6 1153025 1214463 61439 30M 83 Linux ./AVIC.img7 1214465 3311615 2097151 1024M 83 Linux ./AVIC.img8 3311617 3573759 262143 128M 83 Linux ./AVIC.img9 3573761 4622335 1048575 512M 83 Linux Partition table entries are not in disk order. - Now that you've verified the file, you'll want to mount partition 7 to access the sysd.conf file. To do this you'll want to create a new folder under /mnt (I named my avicpart7) and you'll need to know what the offset of partition 7 is in the SDCard. To get this number, look at the sector size (in this case 512) and do some math (START x SECTORSIZE = OFFSET). For this our offset is 621806080. The command would be sudo mount -o loop,offset=621806080 AVIC.img /mnt/avicpart7 - now when you do "ls /mnt/avicpart7/etc" you should the sysd.conf files in with all the other files in the etc folder.
- We only care about the main sysd.conf file, you can modify it by doing 'sudo vim /mnt/avicpart7/etc/sysd.conf' (or your text editor of choice) and scroll all the way to "AVH_W4400NEX" and look for "sysdconf.com.TouchType" then change it from "capacitator" to "resistence". Alternatively, you can copy over the one I did at https://pastebin.com/deeQxhzN.
- Now that you made the changes, go back to your home directory and dismount the partition connected to the image; sudo umount /mnt/avicpart7 (and rm -rf /mnt/avicpart7 if you don't need the directory anymore.)
- Assuming your using the same PC to write the SD image, stick in a supported SDCard and use dd to write it (i.e. dd if=AVIC.img of=/dev/sdX bs=4M where sdX = ID of your Sdcard)
- Pop that bad-boy into your head-unit (remember to insert it into the hidden OS SDCard spot) and watch it boot. Note that depending on what firmware your unit was on, it might reboot a couple of times while it gets reflashed by the v1.02 firmware on the SDCard.
- Provided you followed my instructions (and that I wrote them out correctly), the head-unit should work now.
This should get you going if you're having problems. The next post below goes more indepth about the environment for those who like to tinker.
Thanks for the inspiration, successfully fixed, thanks again
-
-
On 7/16/2022 at 4:34 PM, mclairs said:
Hi All,
Anyone know if Z9250 is the same as W4500NEX? I tried changing the panel touch type to resistence, it does boot but the touchscreen aint working
not sure where else to look at. Just want to confirm before i burn more SDcard away. =(
.jpg.5357a3bec327d35450d9cd19caee5fc3.jpg)
[FIX] SDCard Failed? Software Error on your w4500nex? Look here!
in NEX Series
Posted
hdmi not working