bushing
-
Content Count
27 -
Joined
-
Last visited
Content Type
Profiles
Forums
Blogs
Gallery
Posts posted by bushing
-
-
I'm beginning to wonder if I could fix the sort order problem in the music app..... it would be somewhat of a bitch to do from .smali (maybe more of one than its worth) but.....
Come on, if we're going by how much this stuff is worth doing now ...

-
Hi guys! I already have the apk / odex files disassembled to .smali, I can share them if anyone else wants to look at them
Sofakng, yes, I have some background in EE, glad you like the blog posts!
I have a crafted "update" that you can apply using one of the test modes that can patch the PLCaution nag screen out. It also offers a couple different ways of backing up your internal SD card to external USB or SD; you can use a built-in EasyRecovery mode to re-image the internal SD without opening up the case (or you can use the image to restore the internal card manually if that doesn't work and you can open the thing up.
You can also use the image to reverse-engineer the thing.
The thing is, in order to get the modified system to boot, I have to turn off Warp!!, which makes the system take longer to boot (26 seconds vs 13 seconds); I'm working on that right now (but that's a whole other task).


-
@bushing: You mentioned that you think a secret debug button exists similar to the parking brake bypass. Did you try reversing it from the standpoint of searching for the "SET ON" message that is displayed during the bypass? Maybe if you found that then you would find the code containing other secret bypass buttons, etc.
Also, I really appreciate and enjoy reading your blog posts. I'm glad that you are describing everything instead of just saying "I'm working on it"! I just hope that Pioneer doesn't change the system after the update disabling some of the methods you are using to reverse engineer everything.
Yes, I did try going back from the "SET ON" message. Someone with more practice reversing Android apps could probably find this in five minutes, let me know if anyone wants the APK / ODEX ...
But if I'm doing it on my own, here's what the layout for the AV "Off" screen is (when you're in the AV screen, but all sources are off) -- http://pastie.org/private/z0brsx08glku0erwteuvg
After staring at that for a while, I boil that down to
<CTL_Control_ViewGroupBase layout_width=fill_parent layout_height=fill_parent>
    <CTL_Control_ImageViewBase width=267 height=144 marginLeft=63 marginTop=24 />
    <View width=fill_parent height=fill_parent />
    <CTL_Control_ViewGroupBase width=fill_parent height=fill_parent>
        <CTL_Button_SingleImage id=off_debug_1_button
            width=200 height=200 marginLeft=50 centerVertical=true />
        <CTL_Button_SingleImage id=off_debug_2_button
            width=200 height=200 marginLeft=300 centerVertical=true />
        <CTL_Button_SingleImage id=off_debug_3_button
            width=200 height=200 marginLeft=550 centerVertical=true />
    </CTL_Control_ViewGroupBase>
    <CTL_Button_SingleImage id=off_videoCheckMode_button width=100 height=100
        alignParentLeft=true alignParentBottom=true />
</CTL_Control_ViewGroupBase>
I read that as -- the text "OFF" 267x144, located at 63,24 from top-left of screen. The hidden "videoCheckMode" button, 100x100, on the bottom-left corner of the screen. Three debug buttons, 200x200 each, centered vertically on the screen, at offset 50, offset 300, and offset 550 from the left side of the screen -- if the screen is 800 pixels wide, then that would place debug_2 at the very center of the screen and the other 2 buttons on either side at the edges of the screen.
I tried tapping them, I tried "long-pressing" them (like the "SET ON") button, nothing. I don't know if they need to be pressed in some particular order. There's notes in the code about a "debug password input" but I think that's a separate screen that should pop up once the debug mode is triggered (and we should be able to reverse-engineer the password without much trouble). Really, it's just this GUI stuff that's hard
The screen in question is:

-
The biggest issue on a starting point is unlocking that storage card so you can get to it in other devices. I can understand why you didn't post the password, but that remains the key....
Getting root is easy once the card is unlocked -- mount it on another unix-style machine, stuff "su" in the /system directory and flag it SUID, then stick it back in the head unit!

That also leads to another interesting thought -- if you stick a file manager in the system directory along with /bin/su, you should be able to navigate to an attached device (e.g. SD card in the front, attached USB disk, etc) and install APKs! Whether they'll run given what are probably a number of missing sensors and I/O points, however, is a different thing entirely.
A real hoot would be if it will attach to a WiFi USB adapter; suddenly you have a device that can hit your tether-enabled phone.
Note that "Android" isn't descriptive enough by itself. It is the frameworks that make Android useful, and who knows what's on there unless you go through the storage. One thing that's almost-certainly NOT is GAPPs.
Yeah, the SD card password just isn't useful for most people because it's pretty difficult to use -- and I'm not even sure it's the same for all units! More useful would be a dump of the SD card, because any(?) system will boot an unlocked card; I can't release my image, but hopefully I've provided enough information for someone else to reproduce this and post an image.
No need to "root" the thing, it's pre-rooted, if you can manage to turn on ADB or find the correct serial port and enable it (I believe that both of these are possible by pressing hidden buttons in the display, much like the "bypass").
I've posted another blog post about patching the software -- TL;DR is that I've successfully patched out the nag screen on my own unit but I would have to solder JTAG up to someone else's unit if I wanted to repeat the task. I'm trying to now make an update that could be applied with a USB stick or SD card. I'm having trouble putting all the correct files in place for the system to recognize my update as valid (it tries to install it and then gives an uhelpful error message). I also accidentally got my unit stuck in a Recovery mode with this TESTMODE_N.KEY file, and it took a lot of nerve-wracking fiddling to get it to boot back into the normal mode. (Fortunately, it's possible, but more research is necessary to make this robust.)
I haven't given up on making my own update, but if Pioneer releases the CarPlay update, I should be able to use that as a template to make a nag screen update with just a day or two of work. We'll see who releases an update first. I just need to resist the urge to actually put this thing in my car (right now, it's sitting in pieces on my
floor"workbench") -- if I do, I'll have to unsolder everything and probably won't ever get back to hooking my debug stuff back up to it. -
I don't speak programmer, but what caught my eye was the 8 GB SD card. Is it that simple to upgrade a 7000 to an 8000? I wouldn't think that the disassembly required to reach the SD card would be too onerous.
Could this be adapted to the NEX series?
Possibly; there's a lot of parts missing on my 5000NEX compared to the most expensive models (e.g. HDMI input, internal (visible SD slot), CAN bus interface of some sort? What specific features would you like to try "upgrade"?
You are bushing from failoverflow? I highly respect you and your work!
Thanks for the extremey interesting blog!
It sounds like you might even be able to root the device and/or modify the Pioneer menu systems to install other Android apps, etc.
Thanks for the kind words! Sometimes you just need to find a project that annoys you enough to make it worth the time. This counts, for me. In principle, there's nothing keeping us from rooting these boxes, though more research is necessary to figure out how to e.g. enable ADB. (There seems to be a hidden debug menu that will allow this, but I haven't been able to find it yet.)
-
I'm doing a bit of reversing of my AVIC-5000NEX with the goal of eventually making my own update that disables the nag screen. I'm still quite a ways away from that, but I wrote up a blog post that some of you might find interesting.
-
I have a lot of fun plans for this one --- plans made significantly easier by finding schematic and service info for the NEX series.
Hell, I found the Avic-D1 manual several places, and with a bit of digging I found complete schematics and partial source code for the AppRadios on GoogleCode (wtf?!?)
Any suggestions?
-
I also tried replacing
struct_0
with
struct_0
... and same result (freeze).
-
So I picked up yesterday where this thread left off. I tried NOP'ing a part of the nag_screen_1, identifying the function with the HEX editor and the disassembled code provided on the forum. I did this on the newer 4.0 release. I recomputed checksum and reflashed. Still wasn't able to bypass nag screen. I will test alittle more.
Great! Time to pick this back up, then. I put some updated files (disassembly, etc) here: http://people.freedesktop.org/~bbyer/av ... 07.lst.bz2
I'd like to draw your attention to this table of function pointers:
08C27B40 unktable:
struct_0
struct_0
struct_0
struct_0
struct_0
struct_0
struct_0
struct_0
struct_0
struct_0
struct_0
struct_0
struct_0
struct_0
struct_0
struct_0
struct_0
struct_0
There are two other similar tables (0x8c2804c, 0x8b4eda0), but I can't find references to the first two, only to the latter (TaskTable).
I experimented before with patching the show_nag_1 function, as you tried -- by either nop'ing out parts of it, or modifying jump commands to skip over parts of the function. I saw three different results:
* no change
* Text window is not displayed, but OK button is still displayed -- pressing OK works and allows use of the unit
* Text window is display, OK button is not displayed -- there is no way to continue, even if I try pressing the screen where the button used to be.
I tried replacing
struct_0
with
struct_0
-- and sure enough, instead of the "nag" screen I got the "You have booted up with English, do you want to switch languages?" screen. Picking 'Yes' let me switch languages, but then it froze, as it did when I picked 'No'.
I tried replacing that line with
struct_0
in the hopes that those dummy functions (which only return 0) would make it proceed, but it also just froze when it tried to display the message. (What you'll actually see happen is it will display the map, and then a second later it will shift the view of the map over by a few pixels, and then freeze.)
Someone noted earlier in this thread that you won't get the screen if you have a route already active when you start your car -- it would be nice to find where that check is made and force it to always be true.
-
Sorry, i've been busy, but I've had a number of requests for this, so here ya go -- from memory.
Getting into the Service mode on AVIC-D1 (and D2?)
1. Turn car on, AVIC unit should power on.
2. Hold down OPEN button so that the panel flips down all of the way (as if you were going to replace the Map DVD
3. Using a paperclip (etc), press the Reset button on the LCD panel -- this is inside a small hole next to the directional (joystick) control. Hold down the button.
4. While holding down the reset button, press the DVD drive Eject button (the lower of the two eject buttons, it says "ROM" on it). Hold it down.
5. While holding down the Eject button, release the Reset button.
6. The screen should now say "Please press the [RESET] button." It's lying. Don't do that. You can release the eject button now.
7. Instead of pressing the reset button, enter this code using the joystick:
Up, Up, Down, Down, OK (where OK means "push the joystick in")
8. You should receive a message that says "Password Accepted", and then be in the service menu. If you'd like, you can press the Open button to fold the LCD panel back in.
Reflashing firmware, to change the message text, etc. This is from memory, let me know if you can't figure out what to do from here.
First, prepare a CDR(W) or DVDR(W) with the updated firmware. The easiest way to do this, I found, is:
1. Insert a Map DVD into your computer.
2. Use any program to copy all of the files into a directory on your hard drive.
3. Go into that program and delete all of the large files, and probably all of the directories. In theory, you only need a few of the files -- the ones that contain the firmware -- but I never bothered to figure out which. Instead, just delete enough of the large map-date files such that the resulting files will fit onto your 650MB CDR or 4.7GB single-layer DVDR.
4. Edit the firmware files in that directory, as appropriate
5. Burn the contents of that directory to a CDR or DVDR using any program.
Flashing the firmware:
1. From the main service menu, move the joystick right to get to the second page of the menu
2. Choose "6. Program Forced Write"
3. Choose "3. Application Program"
4. Insert your modified CDR or DVDR into the appropriate drive; if necessary, use the OPEN button to flip the LCD panel and/or use one of the eject buttons to eject a disk already in the drive.
5. Next to option "2. DVD/CD-ROM", it should give a version number and not "NG" (No Good). If so, select it and press OK.
6. Select the appropriate language, in my case "2. English US" with the joystick.
7. The help text at the bottom of the screen directs you to make your selection and press the "[NAVI]" button -- on our units, this is the MAP button in the upper-left corner of the display.
It will then take about 90 seconds to read the firmware off the disk and flash it. When it's done, it will say "100%" for both stages, and you can hit the eject button and remove your modified disk. Then, hit the reset button and watch the unit boot with your new firmware.
If you have modified any of the firmware files without recalculating the checksum as I described earlier in this thread, instead of saying "100%" it will say "NG", IIRC. If you then reset the unit, it will perform the checksum verification upon boot and then display a message saying something like "An Update Is Required, Please Insert Map Disk". If one is already in the drive, it will automatically try to reflash itself. This means that you shouldn't be able to brick the unit by just reflashing the "Application Program".
Now, all that is done by the "System Program", so I'd avoid touching that, if I were you
Hope this helps. -b
-
Okay, I'm pretty much stuck here, so I'm posting what I have so far in the hopes that someone else might be able to get further.
The "Application" code is contained on the DVD as EU050APL.PRG, and it references strings in the file UC050DAT.USA.
http://people.freedesktop.org/~bbyer/avic/eu050apl.prg
http://people.freedesktop.org/~bbyer/avic/UC050DAT.USA
A parsed version of the strings file is here: http://people.freedesktop.org/~bbyer/avic/UC050DAT.USA.txt
That was produced with this program: http://people.freedesktop.org/~bbyer/avic/parse-dat.c
In order to modify either of those files, you'll need to edit the file with a hex editor, and then recompute the checksum, which is stored in the last two bytes of the file. A program to compute the checksum is here: http://people.freedesktop.org/~bbyer/avic/fcs.c
You can reflash modified files onto the unit using just a CD-R and the service menu; I can post details about this if anyone's curious.
Finally, the disassembled code from EU050APL.PRG: http://people.freedesktop.org/~bbyer/avic/eu050apl.lst.bz2
That output's not perfect, but it's getting pretty good. It was produced using IDA Pro and a custom processor plugin for the NEC V830.
The code that retrieves the strings displayed for the "nag screen" is in the function I called show_nag_1, but they aren't actually displayed in that function, and I can't figure out what calls that function, which is where I'm stuck.
I hope to get back to this someday, but am too busy with Real Work at the moment.

-
Excellent work! Did you have to decompress anything within the files? When I loaded it with a hex editor, I didn't find any obvious ASCII for that message.
Thanks
If you scroll back up to http://avic411.com/forum/viewtopic.php?p=25112#25112, that's one of the strings in UC050DAT.USA; the "hard" part was finally figuring out the checksum so that it would actually let me reflash that file using the service menu. (If you don't fix the checksum, it will try to reflash, but it will tell you it failed, and it will refuse to boot until you insert a DVD with a valid copy of that file, which it will then reflash.)I'll post the checksum program in a bit, but what I'm really trying to do is patch the code (in EU050APL.PRG) to skip the screen entirely.
-
-
I've still been working on this, off and on for the past few months. I wrote a V830 disassembler plugin for IDA Pro. While it's not perfect, it works well enough to disassemble most of UC050SYS. I believe the code that verifies the checksums is in there, but I haven't been able to figure out where.
Does anyone here read assembly? I'd be happy to email my partial disassembly...
-
The OS loader starts around 0x1000. I can disassemble there no problem. Another chunk starts at 0x1200. It's using the NEC RX OS. I'll attach some of the documentation I've found so far and the disassembler I'm using.
All I get is garbage at 0x1000 -- 0x1200 looks more promising. (we're talking about UC050SYS.USA, right?)
BTW, I'm not sure if there's a difference in the instruction sets, but the chip in the AVIC-D1 is a "UPD705103GM-180S1". I can't find a datasheet for that anywhere, but I did find one for the UPD705102GM (aka NEC V832), which at least has an identical pinout to the one in the unit.
http://www.necel.com/cgi-bin/nesdis/o006_e.cgi?article=UPD705102
-
They are SMD LEDs. Not sure the size, but replacing them would be similar to replacing LEDs in cell phone keypads. I don't know if people still do that, but back in the old days when monochrome Nokia cell phones were popular, people used to change the LED color of the keypad and LCD. There were lots of tutorials on how to do it. Changing the LEDs in a D1/D2 would be similar. Search Google, there might be sites out there explaining how it's done.
I think removal would be easiest with 2 soldering irons, one on each side of the LED. Installation would probably be easier.
I had a friend that attempted the Nokia LED color change many years ago and screwed up some traces on his phone, so only do this if you don't mind screwing up your HU!
It looks like they're 0603 LEDs (so the same size as the Nokia) ones, and there are 21 green ones and 4 blue ones.
Maybe someday when I'm feeling stupid I'll try to swap out the green ones for red. (I, too, used to mod Nokia phones
)-b
-
I'm starting to see "pre-release" CNDV-70MT discs on eBay.
Anyone know if these are legit?
Anyone wanna go in on a copy to be seeded?

-b
-
Does that mean we can edit the text at least? If so that could be kinda funny.
Probably not until someone figures out the checksum.
Ok, you're right -- there is a checksum. I tried editing UC050DAT.USA and reburning it, then used the service mode menu to force-update the application flash. It worked, but when the unit restarted, it said "beginning program update", tried to reflash (again) off the same DVD, said that the update was corrupt, and then rebooted -- I had to eject the DVD to get it out of a loop.
(Maybe this isn't news, but) I think the checksum is the last 16 bits of the file. Here's what I make of the header:
0000000: a55a 5aa5 7300 0002 5543 3035 3044 4154  .ZZ.s...UC050DAT
0000010: 0000 0000 5553 4100 2ead 0000 4000 0000  ....USA.....@...
0000020: b074 0000 aaaa aaaa aaaa aaaa aaaa aaaa  .t..............
0000030: aaaa aaaa aaaa aaaa aaaa aaaa aaaa aaaa  ................
a55a 5aa5 = magic number
7300 0002 = version number (2.00.0073)
5543 3035 3044 4154 = filename 'UC050DAT'
0000 0000 = padding?
5554 4100 = extension 'USA'
2ead 0000 = 0x0000dae2 = 44334 (filesize)
4000 0000 ? (same for all three languages)
b074 0000 = 0x74b0 ?? this is 0x7ee8 for .ESP and 0x7dec
aaa... padding out to 64 bytes
End of file:
000ad20: 2201 ffff 0000 0000 0000 0000 700c "...........p.
I think the 700c is the checksum.
Unfortunately, the program files look similar:
0000000: a55a 5aa5 5000 0102 4555 3035 3041 504c  .ZZ.P...EU050APL
0000010: 0000 0000 5052 4700 0000 4400 0100 0000  ....PRG...D.....
0000020: ffff ffff ffff ffff ffff ffff ffff ffff  ................
0000030: ffff ffff ffff ffff ffff ffff ffff ffff  ................
a55a 5aa5 = magic number
5000 0102 = version number (2.01.0050?)
4555 3035 3041 504c = filename 'EU050APL'
0000 0000 = padding?
5052 4170 = extension 'PRG'
0000 4400 = 0x00440000 = 4,456,448 (filesize)
0100 0000 ? attributes or flags, maybe?
ffff... padding out to 64 bytes.
End of the file:
043fff0: ffff ffff ffff ffff ffff ffff ffff d8c8 ................
checksum = d8c8?
Any guesses as to how they're calculating that value?
-
What he ^^^^ said. Though a dremel makes MUCH faster work.
What would you recommend for a bit? This is the best picture I could find:

My car is like that, but without the horizontal piece that the yellow arrow is pointing to. Behind it, you can see a black vertical plastic piece that it hooks into, with an oval-shaped cutout at the top.
I need to cut a notch out of the side of it toward the bottom. I have a cutoff wheel for my Dremel, but I don't think that will work -- I need something that will cut from the front.
-
-
Yessome minor surgery to the rear of the dash will make it fit nicely.
Any hints? I see the plastic piece that needs to ... not be there, and I have an idea of how much needs to be removed. I was thinking of taking an X-Acto blade to it, but the plastic is a little thick.
It'd be preferable to take the plastic piece out to work on it, but that requires disassembling the entire dash.
-
Does that mean we can edit the text at least? If so that could be kinda funny.
Probably not until someone figures out the checksum.
Is there a checksum? (It looks like the last 16 bits of the file *could* be one.)
-
Nothing too crazy yet -- but I did find the text for the warning message in UC050DAT.USA.
String 1424 (offset=4a88): 'CAUTION: This Navi product is intended solely as a driving aid. Review instruction manual and select route before driving. Navi is not a substitute for your attentiveness, judgment, and care while driving or moving your vehicle. Always observe safe driving rules and driving laws, and follow road signs even if they contradict Navi's instructions. By pressing OK key, you accept the license agreement in the instruction manual.'
I'm attaching a parsed list of the strings from that file, and the simple C program I wrote to make it.
Assuming we do eventually figure out what needs to be patched, what's the easiest way to test it? Please don't tell me we'll have to burn a new DL DVD-R each time!
-
I just spent 3 hours swearing at this thing, maybe someone here can help:
I'm trying to install an AVIC-D1 into a 2004 Jetta, in place of the existing Monsoon double-din HU. I've read here that it is a tight fit... the best I can do still leaves about 1 cm protruding from the metal cage.
After some experimentation, I discovered that it fits perfectly if I remove the IP-Bus cable from the back of the HU -- the one that's plugged into my GEX-P10XMT.
Anyone ever get this to work in this car, or have any suggestions? The connector seems to be hitting against a plastic support piece.
Ben

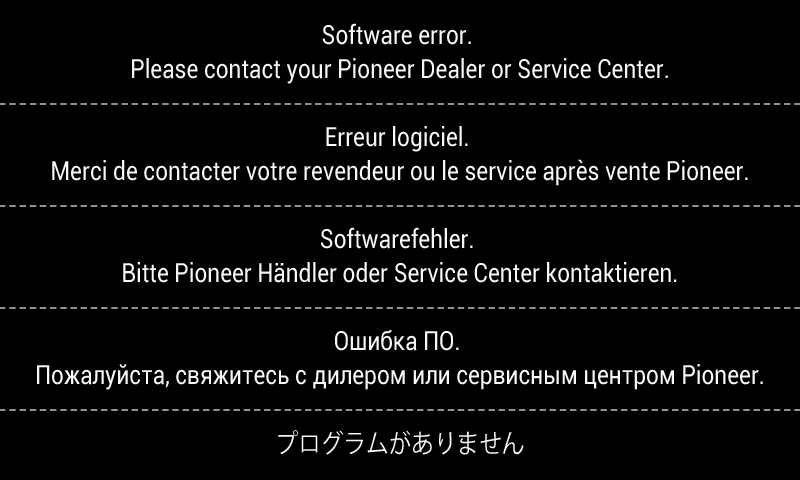
software error screen
in NEX Series
Posted
This screen? This means the internal SD card can't be read: